• Home
  • About
  • Disclosure
  • FAQ
  • Contact Me
jadanchik.comjadanchik.com
  • Home
  • About
  • Disclosure
  • FAQ
  • Contact Me

Creative Sundays With Jo Ann: A Day At The Beach

Creative Sundays With Jo Ann: A Day At The Beach

Creative Sundays With Jo Ann: A Day At The Beach

June 17, 2018 Posted by Jo Ann Danchik Cards, Colored Pencils, Friend, General, Scene Building, Shape Cards, Watercolor

It’s summertime and the beaches are open! It is one of my favorite places to be. I went with my family last month and soaked up some Vitamin Sea. There is nothing that I love more than listening to the sound of the waves, gathering seashells, feeling sand between my toes, and the warmth of the sun on my skin…pure bliss! 

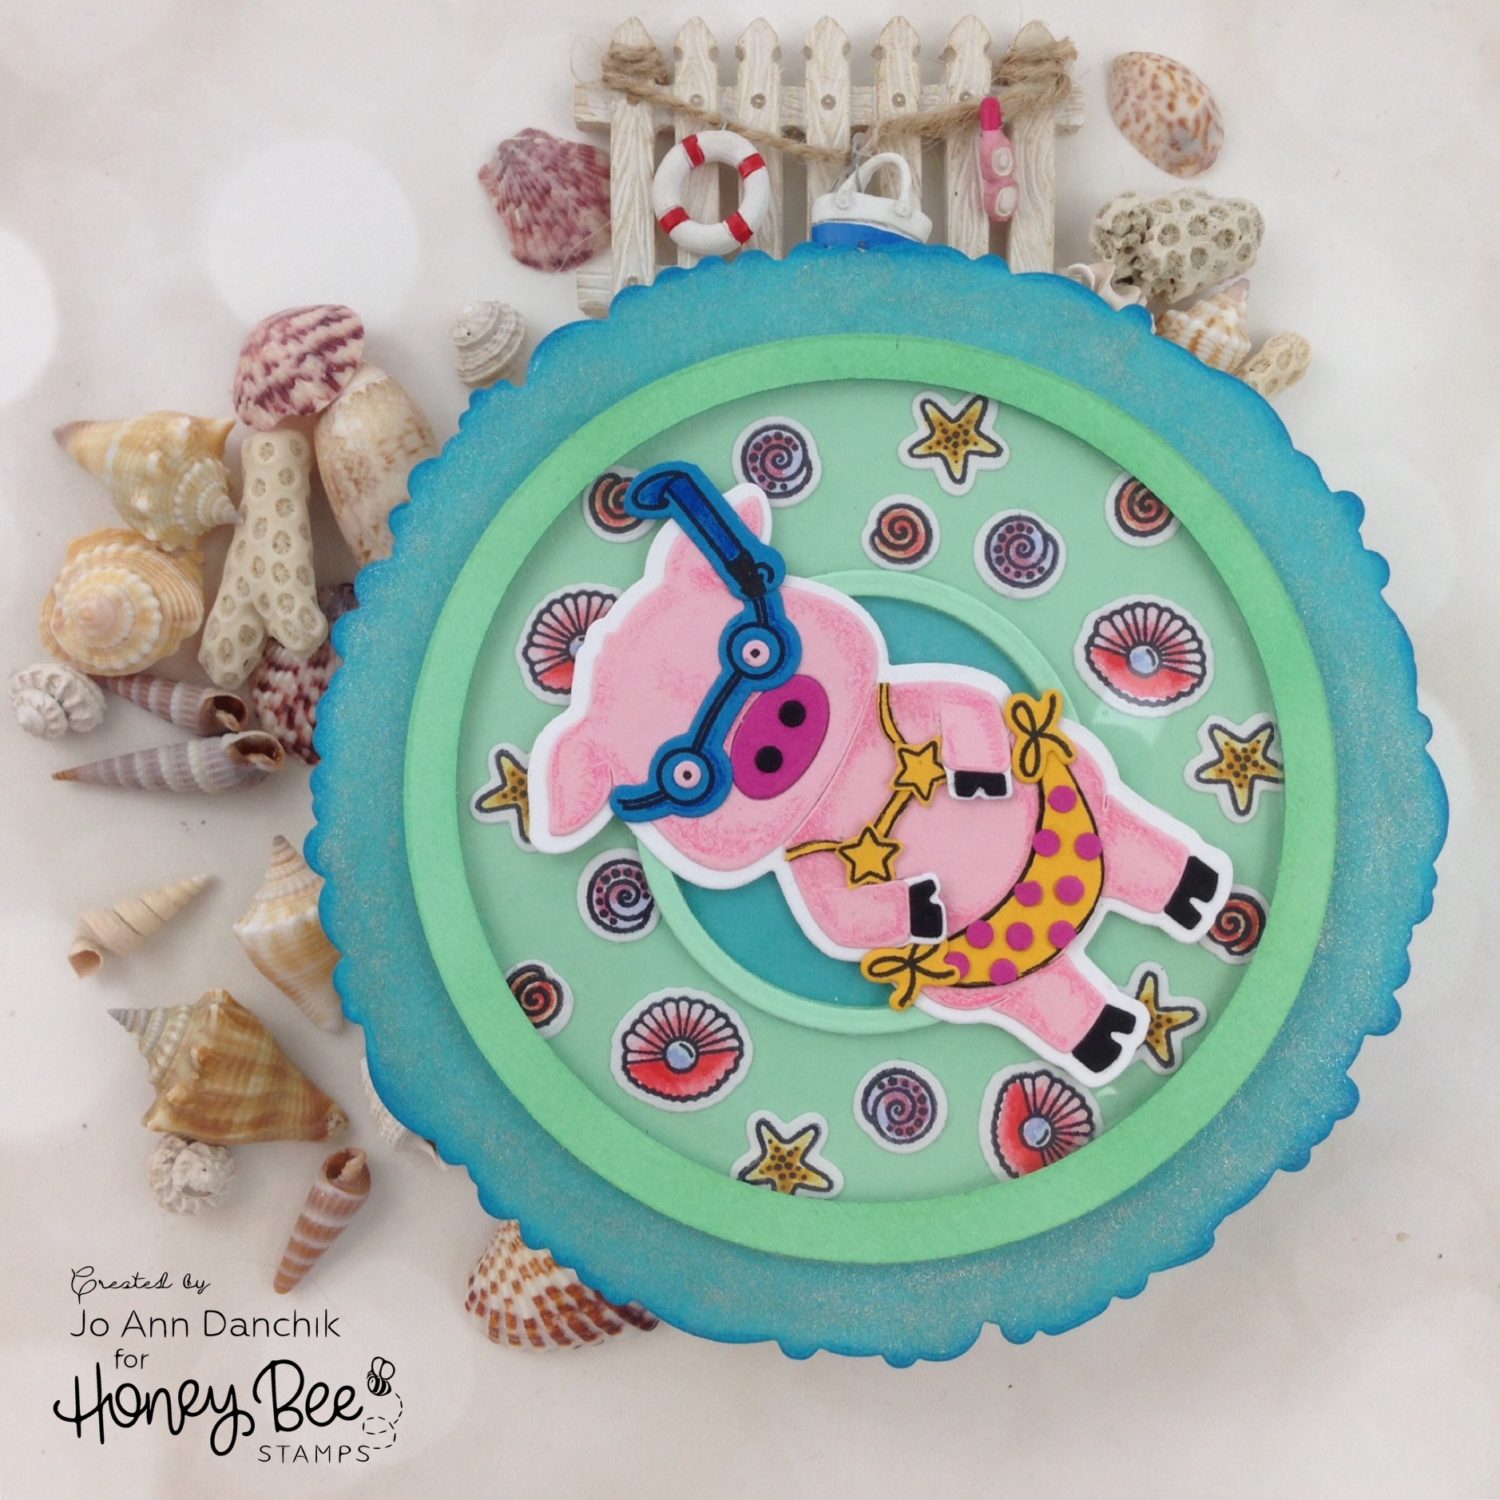
Do you remember the song “Itsy Bitsy Teenie Weenie Yellow Polka Dot Bikini?” It was sung by Bryan Hyland in 1960. When I was young I played my 45 rpm over and over on my record player. Here was my dilemma in making this card. Was it a yellow…polka dot bikini or a yellow polka dot…bikini? I googled it and I still have no idea so I went with a yellow bikini with bright pink polka dots. My apologies to the younger crafters who have no idea what a 45 rpm and a record player are! LOL

____________________

(Compensated affiliate links are used with NO cost to you. Products highlighted in teal are active links. All the supplies used are also linked to multiple shops at the end of the post. Thank you for your support!)

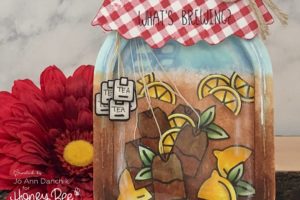
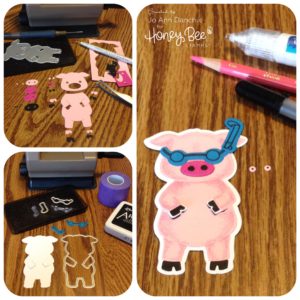
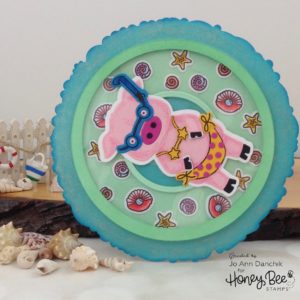
Two weeks ago Pinky The Pig was barbecuing (here). This week the pig family is at the beach and floating in the water on an inner tube. I started with the Pinky Paper Piecing Die. I cut the various parts of the pig using colored cardstock from Simon Says Stamp. The body was cut using Cotton Candy, the Snout from Doll Pink and Black, and the hooves from Black. This die would be cute using patterned paper as well. The Tim Holtz Die Pick is great for removing those tiny pieces from the die and the double ended Jewel Picker is perfect for managing them. 

I thought that the noise maker from the Pinky The Pig Stamp Set looked a bit like a snorkel so I stamped one of those, and the goggles or glasses, onto Island Blue cardstock and cut them using the coordinating die from the Pinky The Pig Die Set. I also cut the whole pig out of #80 Neenah Classic cardstock, using the Pinky The Pig Die Set. This is the base for building the pig.

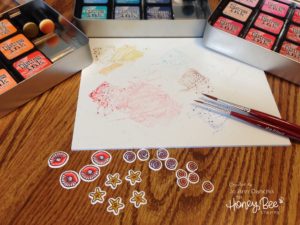
I added some shadows using Prismacolor Color Pencils. Rose PC929 was used on the body. In a later picture you can see where I went back and added Copenhagen Blue PC906 to the snorkel. To give the snout dimension I stacked and glued three layers into the opening. I added the small black dots for the nostrils. The pink eyes were glued down and black pupils were added with a Black Gelly Pen. Everything was glued down using a Lawn Fawn Glue Pen.

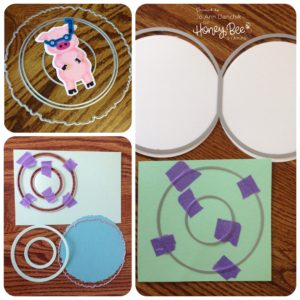
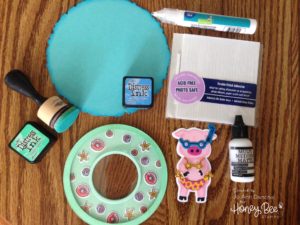
I used the outline die from the Zen Ocean Die Set to cut the water from Audrey Blue cardstock. Hero Arts Round Nesting Dies were used to cut rings for the inner tube from Mint cardstock. (see lower left pic)

A card base was cut from #110 Neenah Classic Cardstock using the Donut Card Die. The bottom to the raft was cut using the larger outer circle and larger inner circle, also using Mint cardstock. I have found the purple tape to be the best for die cutting. It releases easily and has never torn my paper.

Now, onto the bikini. I cut another body out of Sunshine cardstock, again using the Pinky Paper Piecing Die. I drew a string bikini using a pencil and a Sakura Pigma .3 pen. The polka dots were cut from Doll Pink cardstock using a very small hole punch. 

The ties and the star bikini top were stamped using the Celebration Box Stamp Set. The ties were cut using the Celebration Box Die Set and the stars were fussy cut using Cutter Bee Scissors.

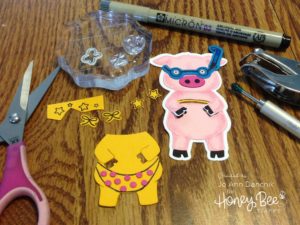
Various shells were stamped using the Zen Ocean Stamp Set and die cut using the coordinating Zen Ocean Die Set. They were watercolored using various Distress Inks in corals, reds, yellows, and blues.

I glued the shells to the inner tube base. I darkened the inner tube rings with Cracked Pistachio Distress Ink. I darkened the edges of the water piece using Salty Ocean Distress Ink. I die cut a piece of acetate and glued the larger ring to it using Ranger’s Multi Matte Medium. Thin strips of Darice Double Sided Foam Tape were taped around the outside edge. I had originally planned to make this a shaker card but changed my mind. I thought that adding the sequins and beads would make the card too busy. The top was added to the bottom and the inner ring was glued on top.

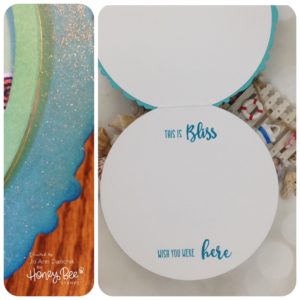
Everything was assembled using glue. It gives you some wiggle room. I gave the water some sparkle by coating it with several layers of Clear Wink Of Stella. The sentiment was stamped on the inside using the Ocean Bliss Stamp Set and Wendy Vecchi Forget-Me-Not Archival Ink.

This card has a few more pieces to it than the average card but it really didn’t take very long to create. And, seriously…the little bulges of pork fat around the bikini crack me up! I hope that it has left you with a smile and some fun ideas of your own for this little pig family.

Thanks for joining me today on another creative journey. Enjoy the rest of your weekend!

Joyfully, Jo Ann

Supplies used:
The products that I used are listed below in compensated affiliate links. You can click the icon of your choice, below the product picture, to go directly to your favorite shop. There is NO additional cost to you when using these links. Thank you for your support!


SaveSave

SaveSave

SaveSave

SaveSave

SaveSave

SaveSave

SaveSave

SaveSave

SaveSave

SaveSave

SaveSave

3
Share

You also might be interested in

Creative Sundays With Jo Ann: Bill the “Pooh” Bear

Creative Sundays With Jo Ann: Bill the “Pooh” Bear

Apr 7, 2019

Last fall I was in Salt Lake City for a[...]

Creative Sundays With Jo Ann: You’re My Person

Creative Sundays With Jo Ann: You’re My Person

Feb 25, 2018

I hope that you have been enjoying the new Cheerful[...]

Creative Sundays With Jo Ann: Faux Chalkboard-Truly Great Friends

Creative Sundays With Jo Ann: Faux Chalkboard-Truly Great Friends

Sep 30, 2018

I love walking into a coffee shop or cafe and[...]

Hello......I'm Jo Ann

Christian, wife, and proud mother and grandma. I love to create art, cook, read a good book, take photos, and travel. -Enjoy life now...this is not a rehearsal!

....

While this blog is my personal journey I hope that you find something here that encourages you to unfurl your wings and be creative. Most everybody has a little childlike creativity in them just waiting to be set free. It doesn't have to be perfect... just create.

....

…………………………………………..

Enter your email address below to subscribe to this blog. You will receive notifications of new posts by email.


* indicates required


*Check your email to confirm subscription.

…………………………………………..

Categories

  • Action Card
  • Alcohol Inks
  • Altered Art
  • Backgrounds
  • Banners
  • Birthday
  • Bookmark
  • Cards
  • Chalk
  • Christmas
  • Colored Pencils
  • Congratulations
  • Copics
  • Distress Inks
  • Distress Oxide Inks
  • Easter
  • Embossing
  • Embossing Paste
  • Encouragement Cards
  • Fall
  • Father's Day
  • Foiling
  • Friend
  • General
  • Get Well
  • Gift Card Holder
  • Gift Tags
  • Graduation
  • Halloween
  • Hello
  • Holiday
  • Holiday Decor
  • Home Decor
  • Ink Blending
  • Interactive
  • Love
  • Markers
  • Masking
  • Miss You
  • Mother's Day
  • New Years
  • No Line Coloring
  • One Layer Cards
  • Ornaments
  • Patriotic
  • Placemats
  • Project
  • Scene Building
  • Shadow Box Cards
  • Shaker Cards
  • Shape Cards
  • Shared Thoughts
  • Shrinky Dinks
  • St. Patrick's Day
  • Stencils
  • Sympathy
  • Tags
  • Techniques
  • Texture Paste
  • Thank You
  • Tools
  • Uncategorized
  • Valentines
  • Wall Art
  • Watercolor
  • Wedding / Anniversary
  • Wreath Builder

Archives

  • June 2019
  • May 2019
  • April 2019
  • March 2019
  • February 2019
  • January 2019
  • December 2018
  • November 2018
  • October 2018
  • September 2018
  • August 2018
  • July 2018
  • June 2018
  • May 2018
  • April 2018
  • March 2018
  • February 2018
  • January 2018
  • December 2017

Recent Posts

  • Midweek Creations With Jo Ann: Floral Cross Background
  • Creative Sundays With Jo Ann: Goodbyes Are Not Forever
  • Midweek Creations With Jo Ann: Tropical Rainforest Shaker Card
  • National Honey Bee Day Blog Hop: You’re The Bee’s Knees
  • Creative Sundays With Jo Ann: Mandala Love

Tags

Angel Policy Stamp Set and Dies Backgrounds Bill The Bear Stamp Set and Dies Birthday Cardmaking Cards Christmas Cloud Border Die Set Colored Pencils Copics Design Team Die Cutting Dies Distress Inks Distress Oxide Inks Encouragement Feelin' Foxy Stamp Set and Dies Friend General Hand Drawing Heat Embossing Holiday Honey Bee Stamps Ink Blending Love Mae The Mouse Stamp Set and Dies Markers Masking Misti Tool New Release One Layer Cards Papercrafting Penny The Platypus Stamp Set and Dies Pinky The Pig Stamp and Die Set Projects Scene Building Snow Buddies Stamp Set and Dies Stamping Stamps Techniques Tools Trinity Stamps Tutorial Valentines Watercolor

Instagram Feed

jadanchik

A study in two different mediums… Tim Holtz WC D A study in two different mediums…
Tim Holtz WC Distress Pencils -v- Windsor & Newton Cotman WC Paints. 👩‍🎨🎨
—————
1. On the right is my original painting using W & N paints. I mixed equal parts Intense Blue and Cadmium Red Pale Hue to make black. I added additional water and thinned down washes to the bird to make the blooms and drips. As the paint thins out it creates lovely bluish tints.
2. On the left I used Tim’s WC Pencils. Distress Black Soot Ink has the unique property of maintaining its true black color as it’s thinned with water. The pencils do as well. Hmmm 🤔 To remedy this I quickly made a thin wash with Prize Ribbon while the painting was still wet. I alternated adding thinned blobs of the black and blue wash until I got the desired results.
—————
The more I study it…the more I prefer the raven on the left! Do you have a favorite?
—————
@tim_holtz @ranger_ink #timholtz #distress #distressinks #distresspencils
When you still have your new pencils out…but hav When you still have your new pencils out…but have no idea what to do with yourself. Cleaning your mess is not the answer. 😜 Then out of the corner of your eye you see Tim’s new “Unraveled” stamp set from Stamper’s Anonymous and some leftover scraps of watercolor paper. You just start to paint. Not sure what it will become when I fussy cut it. Mum(my)’s the word! 🤫
—————
(Swipe left for process pics)
1. Stamped with Antique Linen Distress ink for no line painting.
2. Antique Linen says it all. It’s in the name! But it was too dark so I made a wash and added some Picket Fence to lighten it. The brown is a mix of Walnut Stain and Black Soot.
—————
@tim_holtz @stampersanonymous @ranger_ink #timholtz #stampersanonymous #distress #distressinks #distresspencils
Still testing out the new Tim Holtz Distress Penci Still testing out the new Tim Holtz Distress Pencils. And how much fun is Tim’s new “The Scarecrow” stamp set from Stamper’s Anonymous? 🧡
—————
(Swipe right for process pics)
1. I stamped the scene using Antique Linen Distress Ink for no line painting with the watercolor pencils.
2. I realized that I put the sun on the right but the shadows on the scarecrow are also on the right. 🤔 Simple fix. I wet the shadow lines and lifted them with a paper towel. The crow and the plaid shirt are my favorite parts!!
3. I wanted to create some color blends so I made some heavily pigmented washes.
4. I wasn’t sure how to add a background at this point without a lot of masking. I carefully flooded the paper with water, avoiding the painted areas, and floated in several different light color washes.
—————
@tim_holtz @stampersanonymous @ranger_ink #timholtz #stampersanonymous #distressink #distress #distresspencils
I know…I know…no posts for 2+ years and now he I know…I know…no posts for 2+ years and now here I am posting again! 😜 I would have made this a reel, but after an hour of trying to figure it out I gave up. 🫤
—————
After painting the cat, crow, and bats yesterday I immediately thought of Tim Holtz’s new “Gothic Tapestry” skull from Stamper’s Anonymous. And I wanted to play with my new Distress Pencils some more…of course I did!
—————
I stamped a partial picture using Hickory Smoke Oxide ink. The watercolor paper (140lb cold press) was very textured so the impression is sketchy at best, but I didn’t need a lot of details.
—————
I love it! (Hubby thinks that it looks like Chewbacca!! 😂) 

We are going to need open stock on the black pencil!! @ranger_ink @tim_holtz @stampersanonymous #timholtz #stampersanonymous #distress #distresspencils #watercolopencils
Part Two I tested several of my favorite watercolo Part Two
I tested several of my favorite watercolor pencil methods still using the Windsor & Newton professional cold press 140 lb watercolor paper. High quality paper is oftentimes more important than the quality of paint in getting good results.
1. The first swatch is pencil scribbled directly onto the paper and activated with a water brush. The Seedless Preserves is highly pigmented but a little harder to break down and dissolve. Darker reds and purples sometimes behave this way.
2. The second swatch is dipping the tip of the pencil in the water and smoothing with a wet brush. This delivers a large pigment load. You can also run a wet brush over the tip of the pencil  and then paint. These offer very smooth results.
3. The third swatch is a wash. I like to create a controlled wash. Yes…you can do this easily with pencils. Add a few drops of water to a porcelain well. Run your water brush over the tip of the pencil and swirl it into the water. Repeat multiple times until you get the paint to water ratio that you want. With a wash you can add many layers to your painting.
4. The top picture shows how well the colors lift. This is useful info for adding highlights and shading or if you accidentally drop color in an unwanted area. Being Distress Inks, they don’t appear to react quite the same to water droplets as regular Distress Inks. They do lift when dry, but some colors stain more than others.
(continued in comments)
timholtz @ranger_ink #timholtz #distress #distresspencils #watercolorpencils
Part One I have been watching for the UPS driver a Part One
I have been watching for the UPS driver all week. When my package of Distress Pencils arrived yesterday afternoon I nearly snatched it from their hands! 😂
I work a lot with different watercolor paints, pencils, and crayons so I was eager to play with them. I used Windsor & Newton professional cold press 140 lb watercolor paper to test them. It’s bumpy so you get a lot of white space when you scribble on the pigment.
1. As I tend to layer colors I immediately put them into color families. I know that you like to dig for them Tim but I need them in color order and don’t have your patience. You are a “hunter” and I am a “gatherer.” 😜
2. I swatched them out…not only to have a chart but to check on several properties. It shows me how easily the different colors dissolve on the paper but also how they “water down” into a wash near the bottom of the swatch. The black line shows their transparency. Most colors are highly pigmented, yet transparent, and easy to dissolve.
So far I am loving them!!! (More in next post.)
@tim_holtz @ranger_ink  #timholtz #distress #distresspencils #watercolorpencils
I have been doing a lot of watercoloring this summ I have been doing a lot of watercoloring this summer and thought that I might start posting again. (I haven’t shared my art work socially in over 2 years.) I painted these three Halloween Decoration Cards this morning using Windsor & Newton paints. They are from an older Michael’s class (free) taught by Mandy Peltier. They were a hoot to paint!
@mandypeltierartist @michaelsstores @winsorandnewton #winsorandnewton #makeitwithmichaels #michaelsclasses
Sometimes it is hard to step back, reevaluate, and Sometimes it is hard to step back, reevaluate, and admit that you need to see things differently!! These are powerful phrases that I intend to learn and to use gracefully.
—————
Thanks my friend for allowing me to share your wise words! ❤️@turnertr03
I am learning. I am listening. #blackouttuesday #a I am learning. I am listening.
#blackouttuesday #amplifymelanatedvoices
Load More... Follow on Instagram

Copyright Statement:

All content, including text, photos, and projects are the property of  Jo Ann Danchik. I encourage you to use this blog as inspiration for your personal projects. If you use any parts of this blog on another blog, website, or in any other public forum, please link back to this blog at jadanchik.com rather than copy and paste any of the information.


© [2017] · Jo Ann Danchik · All Rights Reserved.

Prev Next