• Home
  • About
  • Disclosure
  • FAQ
  • Contact Me
jadanchik.comjadanchik.com
  • Home
  • About
  • Disclosure
  • FAQ
  • Contact Me

Bee Inspired New Release Week: Winter Florals and Christmas Plaid

Bee Inspired New Release Week: Winter Florals and Christmas Plaid

Bee Inspired New Release Week: Winter Florals and Christmas Plaid

November 2, 2018 Posted by Jo Ann Danchik Backgrounds, Cards, Christmas, Copics, Distress Inks, Holiday, Ink Blending, Stencils

The Honey Bee Stamps Design Team has had an exciting week of projects to share with you featuring the new DEERLY LOVED Release. Today is the last day before we go back to our regular schedules. I hope that we have given you lots of ideas to help you start your holiday cards, tags, and gift bags. You can find all the new stamp sets, dies, stencils, and sequins HERE.

____________________

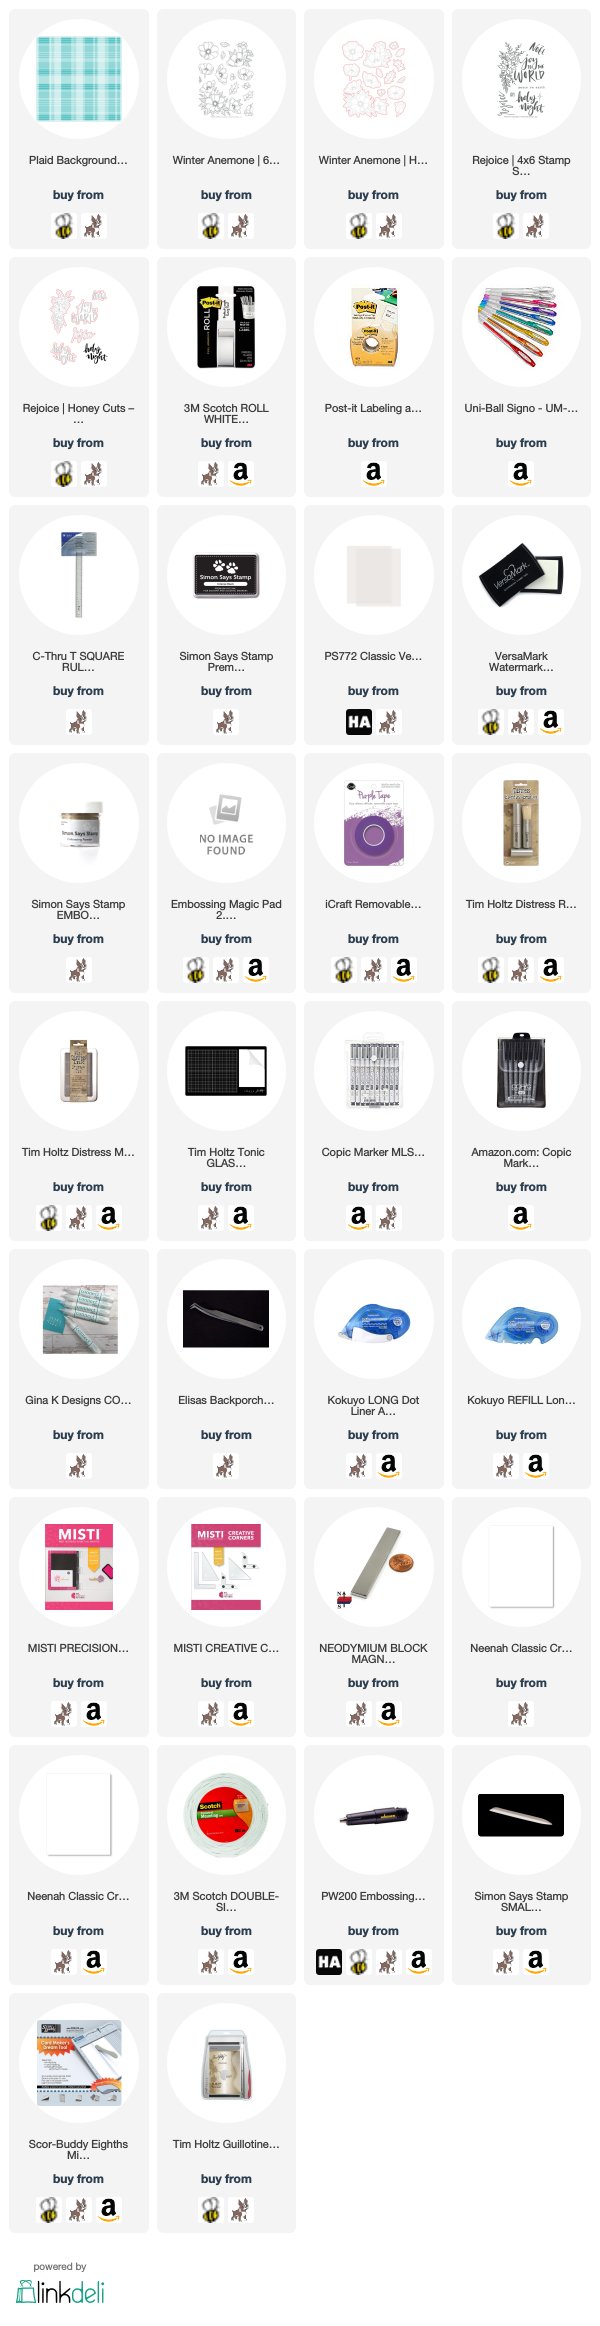
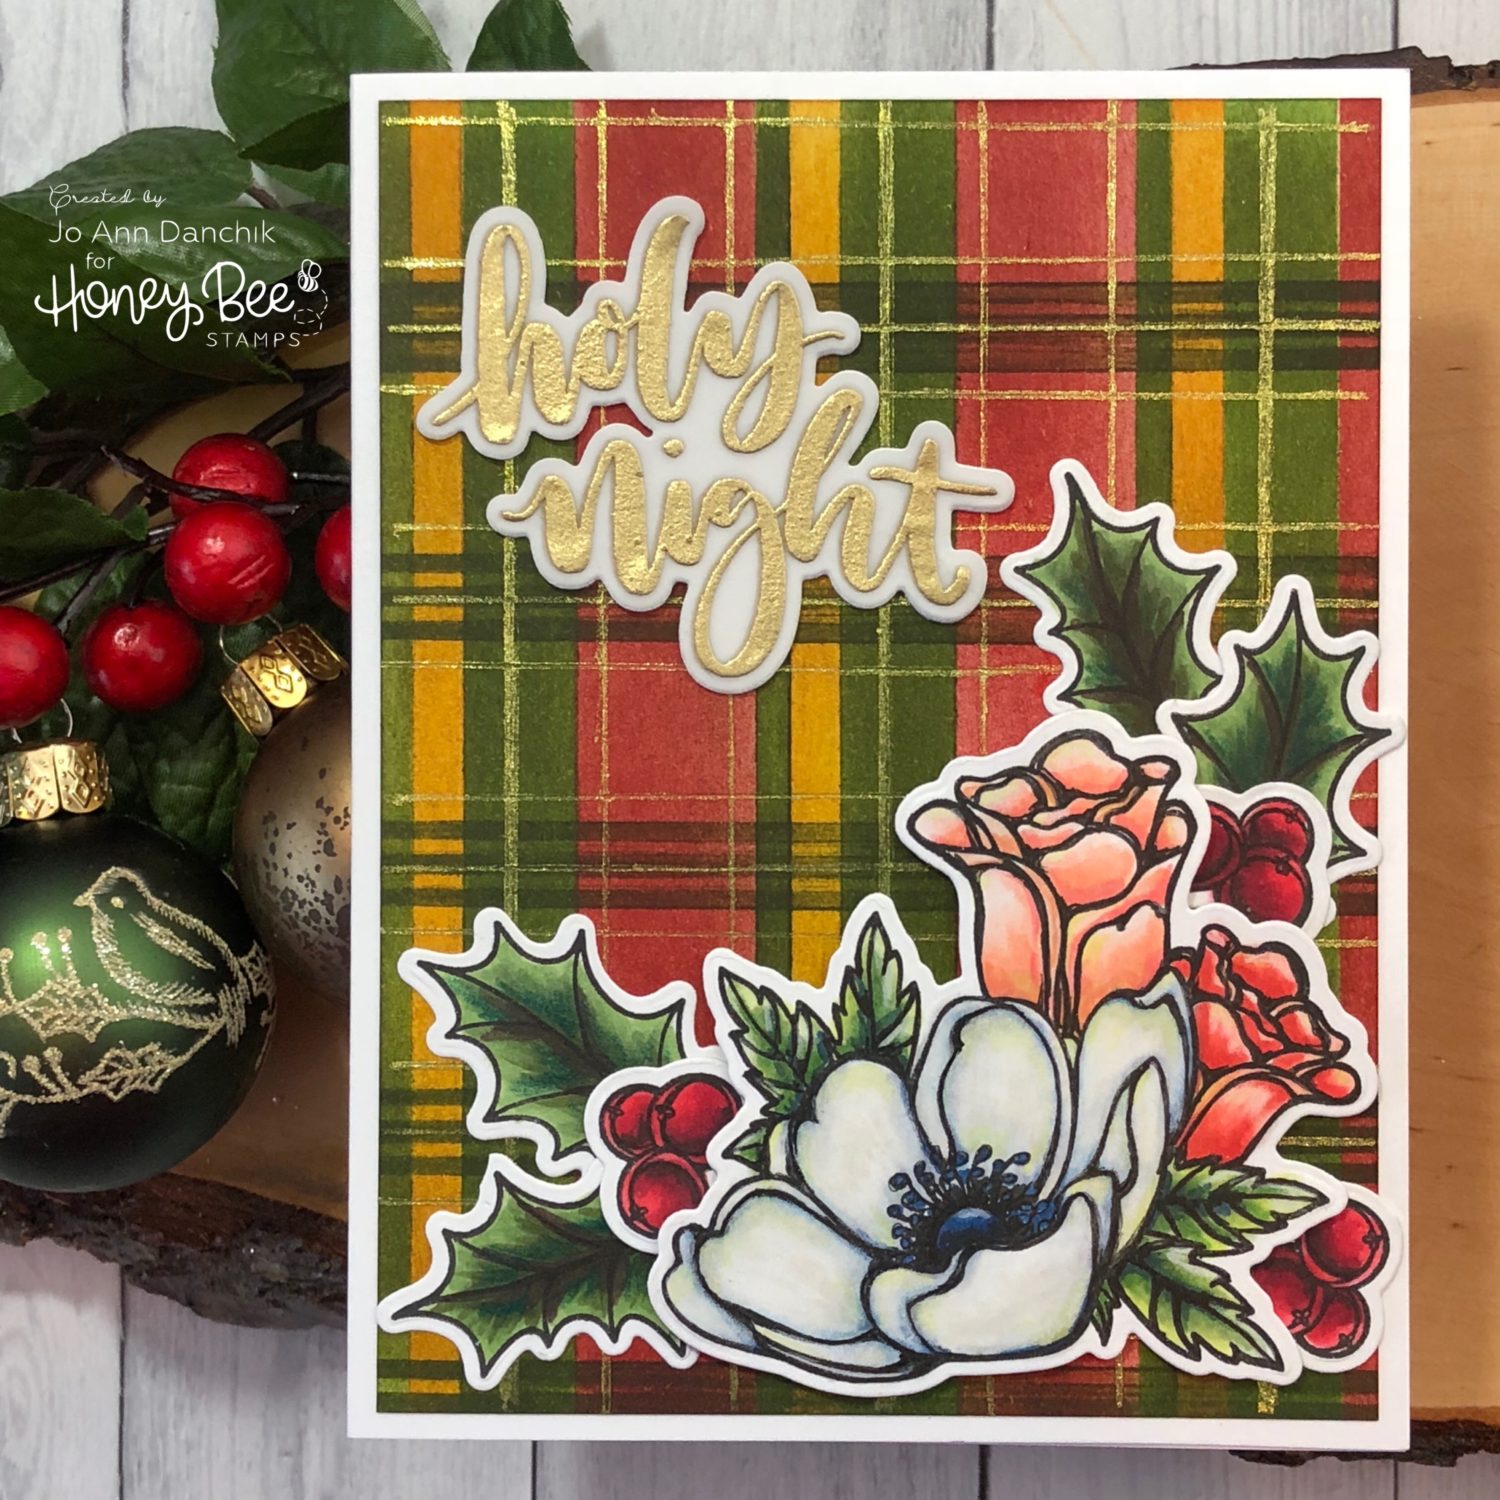
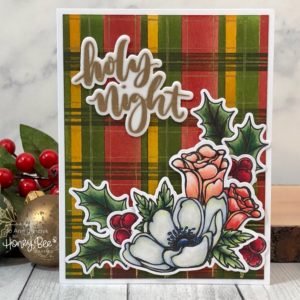
Christmas plaids and winter flower arrangements just seem to go together. Many of the arrangements are festooned with a plaid floral pick and bright shiny ornaments. Just looking at this card is putting me in the Holiday Spirit to decorate, but I will wait until after Thanksgiving. The fall season here in Texas is short…it is back to 82 degrees today…and I don’t want to rush into the next season.

____________________

(All the products used are listed below in compensated affiliate links. Thank you for your support!)

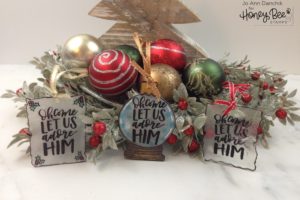
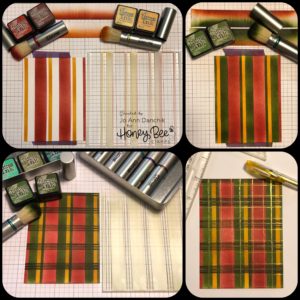
To start the plaid background I used the new Plaid Background Builder Stencil Set and #80 Neenah cardstock. There are four different stencils to choose from to make a simple striped card or to create a variety of plaids. You are only limited by your imagination!

Add purple tape to the back of the card and lay the stencil on top. Post-It tape was used to block off the openings that were not being colored. Tim Holtz Blending Brushes and Distress Inks are perfect for this. I laid a foundation of the lighter color and added shading with the darker color. Be sure to wipe off your stencil between color families.

First layer:
-Fired Brick, Aged Mahogany / Fossilized Amber, Wild Honey
-Remove the stencil.
-Block off open spaces with more Post-It Tape. The grid lines on my work surface help to get them straight.
-Brush on Mowed Lawn and Forest Moss to complete the layer.

Second Layer:
-Turn card 45 degrees an add another stencil.
-Brush on Mowed Lawn and Forest Moss, again masking off openings to avoid getting color in the wrong places.

Third Layer:
-I used a Uni-Ball Signo Sparkling Glitter Gold Gel Pen and a T-Ruler to add more lines in both directions.

I got my glitter pens overseas but I have added a link for a set of multiple colors. They are fabulous for adding a little sparkle and shine to a project.

Hint:
Tim Holtz shared this nifty tip with me. I have a dedicated set of brushes for ink blending…one for each color family. I used colored Sharpies to color the ring around each brush. They are stored in a Mini Ink Storage Tin with the liner removed. I also have a set dedicated to Oxide Inks only. I don’t bother washing the brushes anymore unless I need a light color and the brush is saturated with dark ink.

The flowers, leaves, and berries are from the Winter Anemone Stamp Set. They were stamped with Copic friendly Simon Says Stamp Intense Ink, onto #80 Neenah cardstock, and colored with Copic markers. They were die cut using the coordinating Winter Anemone Die Set.

The sentiment is from the Rejoice Stamp Set. It was stamped on #40 Vellum, using Versamark ink, and embossed with Simon Says Stamp Ultra Fine Gold Powder.

The vellum alone was too light (left) and white cardstock was too stark (right) so I added the vellum on top of the white cardstock for a more subtle look. They were cut using the coordinating Rejoice Die Set. They were layered and glued with a Gina K Design Glue Pen.

Hint:
Use heavyweight vellum to heat emboss. ALWAYS use an anti static powder pouch before stamping. Heat the gun up before taking it to the vellum to avoid warping. I have yet to find an adhesive that you can’t see through vellum so hide your adhesive behind images and words.

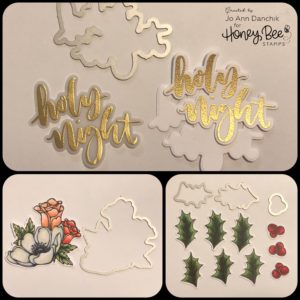
The leaves were glued to the plaid panel using the glue pen. Wet glue gives you plenty of time to move them around. The flowers were added with Scotch Foam Tape for dimension and the berries were tucked in.

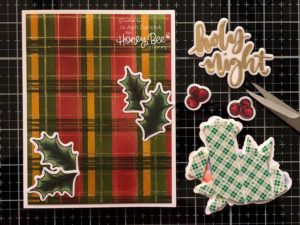
The panel was added to a #110 Neenah Cardstock cardbase using a Kokuyo Tape Runner.

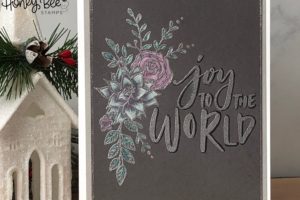
I will be back Sunday for my regular Creative Sunday post featuring the Gift Bag Card from the new release.

As always, thank you for sharing a bit of your time with me today on another creative journey.

Joyfully, Jo Ann

Supplies used: The products that I used are listed below in compensated affiliate links. You can click the icon of your choice, below the product picture, to go directly to your favorite shop. There is NO additional cost to you when using these links. Thank you for your support!

1
Share

You also might be interested in

Creative Sundays With Jo Ann: Holiday Birthday Ornament

Creative Sundays With Jo Ann: Holiday Birthday Ornament

Nov 25, 2018

This past October, several Honey Bee Stamps DT members were[...]

Honey Bee Sneak Peek Day Three: Life Is Sweeter

Honey Bee Sneak Peek Day Three: Life Is Sweeter

Jul 31, 2018

This is Day Three of the BEE BOLD Summer Release[...]

Honey Bee Sneak Peek Day Five: World’s Best Teacher

Honey Bee Sneak Peek Day Five: World’s Best Teacher

Aug 2, 2018

This is Day Five of the BEE BOLD Summer Release[...]

Hello......I'm Jo Ann

Christian, wife, and proud mother and grandma. I love to create art, cook, read a good book, take photos, and travel. -Enjoy life now...this is not a rehearsal!

....

While this blog is my personal journey I hope that you find something here that encourages you to unfurl your wings and be creative. Most everybody has a little childlike creativity in them just waiting to be set free. It doesn't have to be perfect... just create.

....

…………………………………………..

Enter your email address below to subscribe to this blog. You will receive notifications of new posts by email.


* indicates required


*Check your email to confirm subscription.

…………………………………………..

Categories

  • Action Card
  • Alcohol Inks
  • Altered Art
  • Backgrounds
  • Banners
  • Birthday
  • Bookmark
  • Cards
  • Chalk
  • Christmas
  • Colored Pencils
  • Congratulations
  • Copics
  • Distress Inks
  • Distress Oxide Inks
  • Easter
  • Embossing
  • Embossing Paste
  • Encouragement Cards
  • Fall
  • Father's Day
  • Foiling
  • Friend
  • General
  • Get Well
  • Gift Card Holder
  • Gift Tags
  • Graduation
  • Halloween
  • Hello
  • Holiday
  • Holiday Decor
  • Home Decor
  • Ink Blending
  • Interactive
  • Love
  • Markers
  • Masking
  • Miss You
  • Mother's Day
  • New Years
  • No Line Coloring
  • One Layer Cards
  • Ornaments
  • Patriotic
  • Placemats
  • Project
  • Scene Building
  • Shadow Box Cards
  • Shaker Cards
  • Shape Cards
  • Shared Thoughts
  • Shrinky Dinks
  • St. Patrick's Day
  • Stencils
  • Sympathy
  • Tags
  • Techniques
  • Texture Paste
  • Thank You
  • Tools
  • Uncategorized
  • Valentines
  • Wall Art
  • Watercolor
  • Wedding / Anniversary
  • Wreath Builder

Archives

  • June 2019
  • May 2019
  • April 2019
  • March 2019
  • February 2019
  • January 2019
  • December 2018
  • November 2018
  • October 2018
  • September 2018
  • August 2018
  • July 2018
  • June 2018
  • May 2018
  • April 2018
  • March 2018
  • February 2018
  • January 2018
  • December 2017

Recent Posts

  • Midweek Creations With Jo Ann: Floral Cross Background
  • Creative Sundays With Jo Ann: Goodbyes Are Not Forever
  • Midweek Creations With Jo Ann: Tropical Rainforest Shaker Card
  • National Honey Bee Day Blog Hop: You’re The Bee’s Knees
  • Creative Sundays With Jo Ann: Mandala Love

Tags

Angel Policy Stamp Set and Dies Backgrounds Bill The Bear Stamp Set and Dies Birthday Cardmaking Cards Christmas Cloud Border Die Set Colored Pencils Copics Design Team Die Cutting Dies Distress Inks Distress Oxide Inks Encouragement Feelin' Foxy Stamp Set and Dies Friend General Hand Drawing Heat Embossing Holiday Honey Bee Stamps Ink Blending Love Mae The Mouse Stamp Set and Dies Markers Masking Misti Tool New Release One Layer Cards Papercrafting Penny The Platypus Stamp Set and Dies Pinky The Pig Stamp and Die Set Projects Scene Building Snow Buddies Stamp Set and Dies Stamping Stamps Techniques Tools Trinity Stamps Tutorial Valentines Watercolor

Instagram Feed

jadanchik

A study in two different mediums… Tim Holtz WC D A study in two different mediums…
Tim Holtz WC Distress Pencils -v- Windsor & Newton Cotman WC Paints. 👩‍🎨🎨
—————
1. On the right is my original painting using W & N paints. I mixed equal parts Intense Blue and Cadmium Red Pale Hue to make black. I added additional water and thinned down washes to the bird to make the blooms and drips. As the paint thins out it creates lovely bluish tints.
2. On the left I used Tim’s WC Pencils. Distress Black Soot Ink has the unique property of maintaining its true black color as it’s thinned with water. The pencils do as well. Hmmm 🤔 To remedy this I quickly made a thin wash with Prize Ribbon while the painting was still wet. I alternated adding thinned blobs of the black and blue wash until I got the desired results.
—————
The more I study it…the more I prefer the raven on the left! Do you have a favorite?
—————
@tim_holtz @ranger_ink #timholtz #distress #distressinks #distresspencils
When you still have your new pencils out…but hav When you still have your new pencils out…but have no idea what to do with yourself. Cleaning your mess is not the answer. 😜 Then out of the corner of your eye you see Tim’s new “Unraveled” stamp set from Stamper’s Anonymous and some leftover scraps of watercolor paper. You just start to paint. Not sure what it will become when I fussy cut it. Mum(my)’s the word! 🤫
—————
(Swipe left for process pics)
1. Stamped with Antique Linen Distress ink for no line painting.
2. Antique Linen says it all. It’s in the name! But it was too dark so I made a wash and added some Picket Fence to lighten it. The brown is a mix of Walnut Stain and Black Soot.
—————
@tim_holtz @stampersanonymous @ranger_ink #timholtz #stampersanonymous #distress #distressinks #distresspencils
Still testing out the new Tim Holtz Distress Penci Still testing out the new Tim Holtz Distress Pencils. And how much fun is Tim’s new “The Scarecrow” stamp set from Stamper’s Anonymous? 🧡
—————
(Swipe right for process pics)
1. I stamped the scene using Antique Linen Distress Ink for no line painting with the watercolor pencils.
2. I realized that I put the sun on the right but the shadows on the scarecrow are also on the right. 🤔 Simple fix. I wet the shadow lines and lifted them with a paper towel. The crow and the plaid shirt are my favorite parts!!
3. I wanted to create some color blends so I made some heavily pigmented washes.
4. I wasn’t sure how to add a background at this point without a lot of masking. I carefully flooded the paper with water, avoiding the painted areas, and floated in several different light color washes.
—————
@tim_holtz @stampersanonymous @ranger_ink #timholtz #stampersanonymous #distressink #distress #distresspencils
I know…I know…no posts for 2+ years and now he I know…I know…no posts for 2+ years and now here I am posting again! 😜 I would have made this a reel, but after an hour of trying to figure it out I gave up. 🫤
—————
After painting the cat, crow, and bats yesterday I immediately thought of Tim Holtz’s new “Gothic Tapestry” skull from Stamper’s Anonymous. And I wanted to play with my new Distress Pencils some more…of course I did!
—————
I stamped a partial picture using Hickory Smoke Oxide ink. The watercolor paper (140lb cold press) was very textured so the impression is sketchy at best, but I didn’t need a lot of details.
—————
I love it! (Hubby thinks that it looks like Chewbacca!! 😂) 

We are going to need open stock on the black pencil!! @ranger_ink @tim_holtz @stampersanonymous #timholtz #stampersanonymous #distress #distresspencils #watercolopencils
Part Two I tested several of my favorite watercolo Part Two
I tested several of my favorite watercolor pencil methods still using the Windsor & Newton professional cold press 140 lb watercolor paper. High quality paper is oftentimes more important than the quality of paint in getting good results.
1. The first swatch is pencil scribbled directly onto the paper and activated with a water brush. The Seedless Preserves is highly pigmented but a little harder to break down and dissolve. Darker reds and purples sometimes behave this way.
2. The second swatch is dipping the tip of the pencil in the water and smoothing with a wet brush. This delivers a large pigment load. You can also run a wet brush over the tip of the pencil  and then paint. These offer very smooth results.
3. The third swatch is a wash. I like to create a controlled wash. Yes…you can do this easily with pencils. Add a few drops of water to a porcelain well. Run your water brush over the tip of the pencil and swirl it into the water. Repeat multiple times until you get the paint to water ratio that you want. With a wash you can add many layers to your painting.
4. The top picture shows how well the colors lift. This is useful info for adding highlights and shading or if you accidentally drop color in an unwanted area. Being Distress Inks, they don’t appear to react quite the same to water droplets as regular Distress Inks. They do lift when dry, but some colors stain more than others.
(continued in comments)
timholtz @ranger_ink #timholtz #distress #distresspencils #watercolorpencils
Part One I have been watching for the UPS driver a Part One
I have been watching for the UPS driver all week. When my package of Distress Pencils arrived yesterday afternoon I nearly snatched it from their hands! 😂
I work a lot with different watercolor paints, pencils, and crayons so I was eager to play with them. I used Windsor & Newton professional cold press 140 lb watercolor paper to test them. It’s bumpy so you get a lot of white space when you scribble on the pigment.
1. As I tend to layer colors I immediately put them into color families. I know that you like to dig for them Tim but I need them in color order and don’t have your patience. You are a “hunter” and I am a “gatherer.” 😜
2. I swatched them out…not only to have a chart but to check on several properties. It shows me how easily the different colors dissolve on the paper but also how they “water down” into a wash near the bottom of the swatch. The black line shows their transparency. Most colors are highly pigmented, yet transparent, and easy to dissolve.
So far I am loving them!!! (More in next post.)
@tim_holtz @ranger_ink  #timholtz #distress #distresspencils #watercolorpencils
I have been doing a lot of watercoloring this summ I have been doing a lot of watercoloring this summer and thought that I might start posting again. (I haven’t shared my art work socially in over 2 years.) I painted these three Halloween Decoration Cards this morning using Windsor & Newton paints. They are from an older Michael’s class (free) taught by Mandy Peltier. They were a hoot to paint!
@mandypeltierartist @michaelsstores @winsorandnewton #winsorandnewton #makeitwithmichaels #michaelsclasses
Sometimes it is hard to step back, reevaluate, and Sometimes it is hard to step back, reevaluate, and admit that you need to see things differently!! These are powerful phrases that I intend to learn and to use gracefully.
—————
Thanks my friend for allowing me to share your wise words! ❤️@turnertr03
I am learning. I am listening. #blackouttuesday #a I am learning. I am listening.
#blackouttuesday #amplifymelanatedvoices
Load More... Follow on Instagram

Copyright Statement:

All content, including text, photos, and projects are the property of  Jo Ann Danchik. I encourage you to use this blog as inspiration for your personal projects. If you use any parts of this blog on another blog, website, or in any other public forum, please link back to this blog at jadanchik.com rather than copy and paste any of the information.


© [2017] · Jo Ann Danchik · All Rights Reserved.

Prev Next