• Home
  • About
  • Disclosure
  • FAQ
  • Contact Me
jadanchik.comjadanchik.com
  • Home
  • About
  • Disclosure
  • FAQ
  • Contact Me

Creative Sundays with Jo Ann: Bushel and A Peck – One Stamp…Two Ways.

Creative Sundays with Jo Ann: Bushel and A Peck – One Stamp…Two Ways.

Creative Sundays with Jo Ann: Bushel and A Peck – One Stamp…Two Ways.

January 1, 2018 Posted by Jo Ann Danchik Cards, Distress Inks, Friend, General, Ink Blending, Love, Masking, Techniques, Watercolor

This post was originally seen on the Honey Bee Stamp Blog on 10/15/17. I am adding it to my personal blog so that it can be archived. Enjoy!

……….

“I love you a bushel and a peck. A bushel and a peck and a hug around the neck.”

My mother sang that song to us when we were little. I sang it to my children and now they sing it to their babies. Making memories with traditions! My mother suffers from Alzheimers and I now sing it back to her. She does not always remember who I am, but when I sing to her her face lights up with a warm smile, she hums along, hugs me, and tells me that she loves me too! Music has a muscle memory for all of us and that is why I love this song and simply had to have this stamp set!

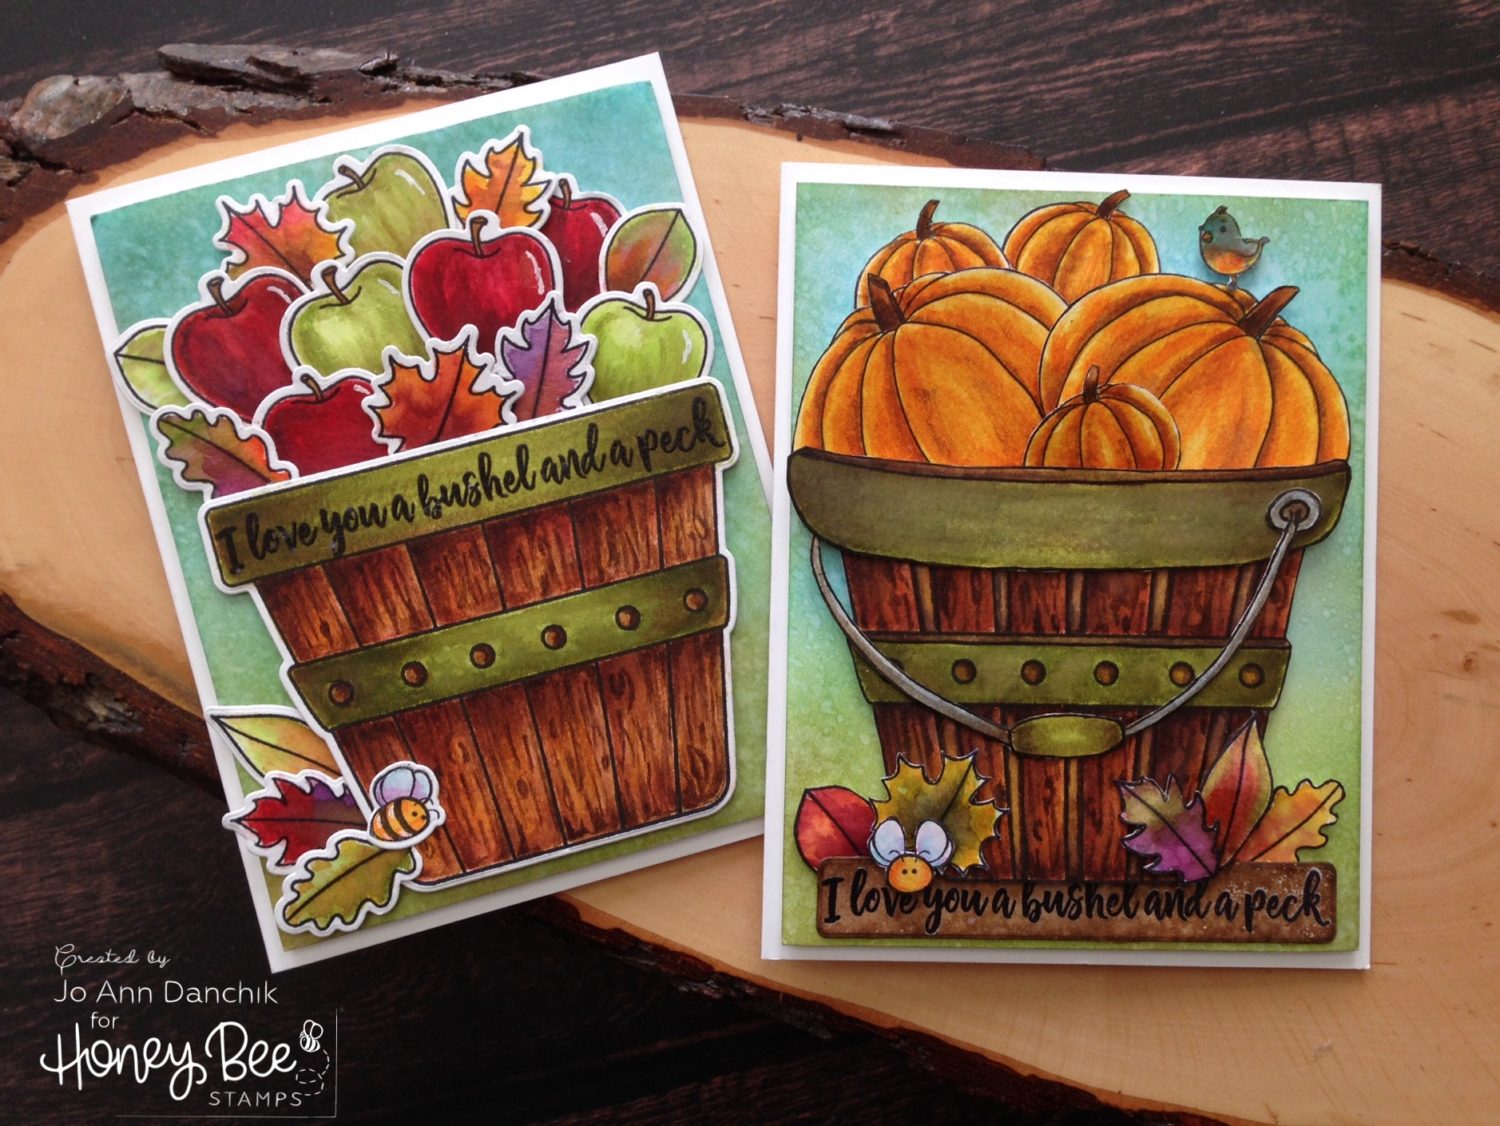
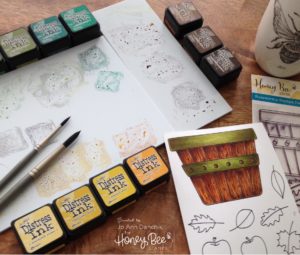
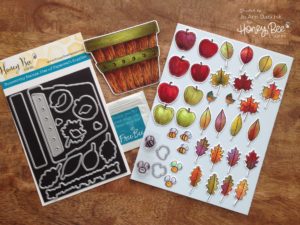
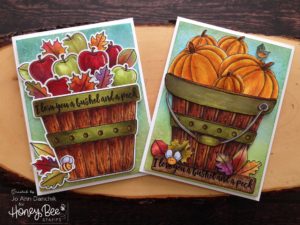
I wanted to show you two different looks that you can achieve using the Bushel and A Peck Stamps and the coordinating die set. All the images on both cards were stamped with Ranger’s Black Archival Ink on Tim Holtz’s Watercolor Cardstock and watercolored with Distress Inks.

Grab a mug of coffee or tea, put your feet up, and let’s get inky!

……….

Card One

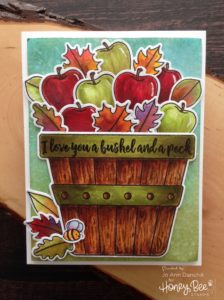
The first card features the Bushel and A Peck Stamp Set and coordinating dies, as they were intended. It’s fast and easy and allows you to produce beautiful cards with minimal effort.

The stamp set includes two different size apples and a variety of leaves. I stamped, watercolored, and die cut plenty of each as I wasn’t sure how many I would need to fill both cards. The two different tiny Honey Bees are from the Free Bee of the Month. One is included with every order. If you spend $75 Honey Bee will also include the coordinating Die. They are so cute…and they’re free!

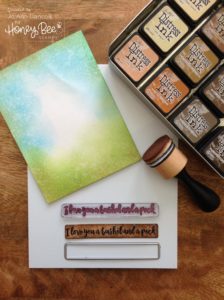
The background was achieved using various blues, greens, and Vintage Photo Distress Inks and a Mini Ink Blender Tool. I lightly sprayed water on it for a mottled, distressed look. The sentiment was stamped with black ink and embossed with clear embossing powder. Everything was assembled onto the card front using Ranger’s Multi Matte Medium. Scotch Foam Tape was used to give added dimension to the basket and some of the apples and leaves. To finish, I added white Fun Foam to the back, using plenty of 1/4” Score Tape, and attached it to the card base.

Card Two

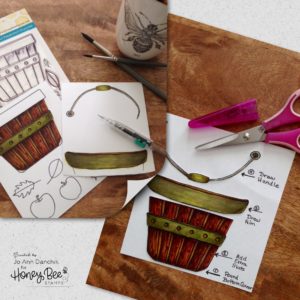
The second card features several simple ways that you can easily customize this, or any other stamp set, for a unique look. A pencil, with a good eraser, and a marker are all that you will need. I used a waterproof Pigma Micron Pen because I was using watercolors. If you are using Copic markers you would want to use a pen that is alcohol friendly, such as the Copic Multiliner Fine Nib Inking Pens.

Here you can see the alterations that I made to the second bushel basket. I rounded the bottom corner (1), added recessed vertical wooden slats by drawing additional straight lines (2), drew a wire handle with a wooden grip (3), and created a more rounded top for more depth (4). None of these additions were difficult and they add a unique, personal touch.

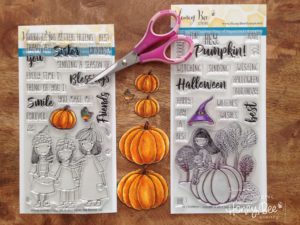
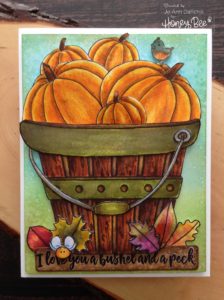
I decided to add pumpkins to the second basket. It was easy enough to mask off the girl from the Hey Pumpkin Stamp Set and fill in the lines to complete the large pumpkin.

Several small pumpkins and the bird were stamped using the Acorn Sisters Stamp Set. Since the large pumpkin had to be fussy cut I kept the card unified by hand cutting all the pieces for this card, using my EK Success Cutter Bee Scissors.

I made another background using the same Distress Inks as before. Because of the handle, I was unable to add the sentiment to the basket rim. I stamped and embossed it on a separate piece of paper and cut it out with the banner die included in the set. Various brown Distress Inks and a Mini Ink Blender Tool were used to color the background.

I assembled the card in the same manner as Card One using Ranger’s Multi Medium Matte, Scotch Foam Tape, Fun Foam, and 1/4” Score Tape.

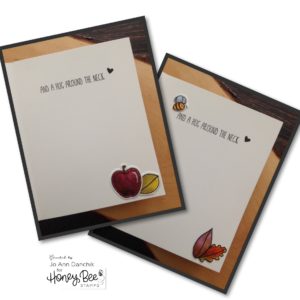
The rest of the sentiment and a tiny heart were stamped inside of each card. I added a scattering of the left over apples, leaves, and honeybees for additional interest.

For a third variation you could also use this stamp set and Paper Piecing. There are many wonderful Wood background paper pads on the market that would work well for the basket. Small prints, stripes, dots, and plaids would work beautifully for the apples, leaves, and pumpkins. Nuvo Drops or Ranger’s Inkssential Enamel Dots could be added for the decorative metal nails in the basket. Get creative! Play around and get more out of your stamp and die sets.

Thanks for joining me today on this creative journey.
Joyfully,  Jo Ann

SaveSave

SaveSave

SaveSave

SaveSave

SaveSave

SaveSave

SaveSave

SaveSave

SaveSave

SaveSave

SaveSave

SaveSave

SaveSave

SaveSave

SaveSave

SaveSave

SaveSave

SaveSave

SaveSave

SaveSave

SaveSave

4
Share

You also might be interested in

Creative Sundays With Jo Ann: Birthday Bear – Part One

Creative Sundays With Jo Ann: Birthday Bear – Part One

Aug 26, 2018

I needed a masculine birthday card to celebrate a family[...]

Honey Bee and Simon Says STAMPtember Exclusive: Tie One On

Honey Bee and Simon Says STAMPtember Exclusive: Tie One On

Sep 18, 2018

The newest STAMPember exclusive collaboration is here. It is Tie[...]

Creative Sundays with Jo Ann: Loads of Hugs & Kisses

Creative Sundays with Jo Ann: Loads of Hugs & Kisses

Jan 21, 2018

I have a passion for rusty old farm trucks filled[...]

Hello......I'm Jo Ann

Christian, wife, and proud mother and grandma. I love to create art, cook, read a good book, take photos, and travel. -Enjoy life now...this is not a rehearsal!

....

While this blog is my personal journey I hope that you find something here that encourages you to unfurl your wings and be creative. Most everybody has a little childlike creativity in them just waiting to be set free. It doesn't have to be perfect... just create.

....

…………………………………………..

Enter your email address below to subscribe to this blog. You will receive notifications of new posts by email.


* indicates required


*Check your email to confirm subscription.

…………………………………………..

Categories

  • Action Card
  • Alcohol Inks
  • Altered Art
  • Backgrounds
  • Banners
  • Birthday
  • Bookmark
  • Cards
  • Chalk
  • Christmas
  • Colored Pencils
  • Congratulations
  • Copics
  • Distress Inks
  • Distress Oxide Inks
  • Easter
  • Embossing
  • Embossing Paste
  • Encouragement Cards
  • Fall
  • Father's Day
  • Foiling
  • Friend
  • General
  • Get Well
  • Gift Card Holder
  • Gift Tags
  • Graduation
  • Halloween
  • Hello
  • Holiday
  • Holiday Decor
  • Home Decor
  • Ink Blending
  • Interactive
  • Love
  • Markers
  • Masking
  • Miss You
  • Mother's Day
  • New Years
  • No Line Coloring
  • One Layer Cards
  • Ornaments
  • Patriotic
  • Placemats
  • Project
  • Scene Building
  • Shadow Box Cards
  • Shaker Cards
  • Shape Cards
  • Shared Thoughts
  • Shrinky Dinks
  • St. Patrick's Day
  • Stencils
  • Sympathy
  • Tags
  • Techniques
  • Texture Paste
  • Thank You
  • Tools
  • Uncategorized
  • Valentines
  • Wall Art
  • Watercolor
  • Wedding / Anniversary
  • Wreath Builder

Archives

  • June 2019
  • May 2019
  • April 2019
  • March 2019
  • February 2019
  • January 2019
  • December 2018
  • November 2018
  • October 2018
  • September 2018
  • August 2018
  • July 2018
  • June 2018
  • May 2018
  • April 2018
  • March 2018
  • February 2018
  • January 2018
  • December 2017

Recent Posts

  • Midweek Creations With Jo Ann: Floral Cross Background
  • Creative Sundays With Jo Ann: Goodbyes Are Not Forever
  • Midweek Creations With Jo Ann: Tropical Rainforest Shaker Card
  • National Honey Bee Day Blog Hop: You’re The Bee’s Knees
  • Creative Sundays With Jo Ann: Mandala Love

Tags

Angel Policy Stamp Set and Dies Backgrounds Bill The Bear Stamp Set and Dies Birthday Cardmaking Cards Christmas Cloud Border Die Set Colored Pencils Copics Design Team Die Cutting Dies Distress Inks Distress Oxide Inks Encouragement Feelin' Foxy Stamp Set and Dies Friend General Hand Drawing Heat Embossing Holiday Honey Bee Stamps Ink Blending Love Mae The Mouse Stamp Set and Dies Markers Masking Misti Tool New Release One Layer Cards Papercrafting Penny The Platypus Stamp Set and Dies Pinky The Pig Stamp and Die Set Projects Scene Building Snow Buddies Stamp Set and Dies Stamping Stamps Techniques Tools Trinity Stamps Tutorial Valentines Watercolor

Instagram Feed

jadanchik

A study in two different mediums… Tim Holtz WC D A study in two different mediums…
Tim Holtz WC Distress Pencils -v- Windsor & Newton Cotman WC Paints. 👩‍🎨🎨
—————
1. On the right is my original painting using W & N paints. I mixed equal parts Intense Blue and Cadmium Red Pale Hue to make black. I added additional water and thinned down washes to the bird to make the blooms and drips. As the paint thins out it creates lovely bluish tints.
2. On the left I used Tim’s WC Pencils. Distress Black Soot Ink has the unique property of maintaining its true black color as it’s thinned with water. The pencils do as well. Hmmm 🤔 To remedy this I quickly made a thin wash with Prize Ribbon while the painting was still wet. I alternated adding thinned blobs of the black and blue wash until I got the desired results.
—————
The more I study it…the more I prefer the raven on the left! Do you have a favorite?
—————
@tim_holtz @ranger_ink #timholtz #distress #distressinks #distresspencils
When you still have your new pencils out…but hav When you still have your new pencils out…but have no idea what to do with yourself. Cleaning your mess is not the answer. 😜 Then out of the corner of your eye you see Tim’s new “Unraveled” stamp set from Stamper’s Anonymous and some leftover scraps of watercolor paper. You just start to paint. Not sure what it will become when I fussy cut it. Mum(my)’s the word! 🤫
—————
(Swipe left for process pics)
1. Stamped with Antique Linen Distress ink for no line painting.
2. Antique Linen says it all. It’s in the name! But it was too dark so I made a wash and added some Picket Fence to lighten it. The brown is a mix of Walnut Stain and Black Soot.
—————
@tim_holtz @stampersanonymous @ranger_ink #timholtz #stampersanonymous #distress #distressinks #distresspencils
Still testing out the new Tim Holtz Distress Penci Still testing out the new Tim Holtz Distress Pencils. And how much fun is Tim’s new “The Scarecrow” stamp set from Stamper’s Anonymous? 🧡
—————
(Swipe right for process pics)
1. I stamped the scene using Antique Linen Distress Ink for no line painting with the watercolor pencils.
2. I realized that I put the sun on the right but the shadows on the scarecrow are also on the right. 🤔 Simple fix. I wet the shadow lines and lifted them with a paper towel. The crow and the plaid shirt are my favorite parts!!
3. I wanted to create some color blends so I made some heavily pigmented washes.
4. I wasn’t sure how to add a background at this point without a lot of masking. I carefully flooded the paper with water, avoiding the painted areas, and floated in several different light color washes.
—————
@tim_holtz @stampersanonymous @ranger_ink #timholtz #stampersanonymous #distressink #distress #distresspencils
I know…I know…no posts for 2+ years and now he I know…I know…no posts for 2+ years and now here I am posting again! 😜 I would have made this a reel, but after an hour of trying to figure it out I gave up. 🫤
—————
After painting the cat, crow, and bats yesterday I immediately thought of Tim Holtz’s new “Gothic Tapestry” skull from Stamper’s Anonymous. And I wanted to play with my new Distress Pencils some more…of course I did!
—————
I stamped a partial picture using Hickory Smoke Oxide ink. The watercolor paper (140lb cold press) was very textured so the impression is sketchy at best, but I didn’t need a lot of details.
—————
I love it! (Hubby thinks that it looks like Chewbacca!! 😂) 

We are going to need open stock on the black pencil!! @ranger_ink @tim_holtz @stampersanonymous #timholtz #stampersanonymous #distress #distresspencils #watercolopencils
Part Two I tested several of my favorite watercolo Part Two
I tested several of my favorite watercolor pencil methods still using the Windsor & Newton professional cold press 140 lb watercolor paper. High quality paper is oftentimes more important than the quality of paint in getting good results.
1. The first swatch is pencil scribbled directly onto the paper and activated with a water brush. The Seedless Preserves is highly pigmented but a little harder to break down and dissolve. Darker reds and purples sometimes behave this way.
2. The second swatch is dipping the tip of the pencil in the water and smoothing with a wet brush. This delivers a large pigment load. You can also run a wet brush over the tip of the pencil  and then paint. These offer very smooth results.
3. The third swatch is a wash. I like to create a controlled wash. Yes…you can do this easily with pencils. Add a few drops of water to a porcelain well. Run your water brush over the tip of the pencil and swirl it into the water. Repeat multiple times until you get the paint to water ratio that you want. With a wash you can add many layers to your painting.
4. The top picture shows how well the colors lift. This is useful info for adding highlights and shading or if you accidentally drop color in an unwanted area. Being Distress Inks, they don’t appear to react quite the same to water droplets as regular Distress Inks. They do lift when dry, but some colors stain more than others.
(continued in comments)
timholtz @ranger_ink #timholtz #distress #distresspencils #watercolorpencils
Part One I have been watching for the UPS driver a Part One
I have been watching for the UPS driver all week. When my package of Distress Pencils arrived yesterday afternoon I nearly snatched it from their hands! 😂
I work a lot with different watercolor paints, pencils, and crayons so I was eager to play with them. I used Windsor & Newton professional cold press 140 lb watercolor paper to test them. It’s bumpy so you get a lot of white space when you scribble on the pigment.
1. As I tend to layer colors I immediately put them into color families. I know that you like to dig for them Tim but I need them in color order and don’t have your patience. You are a “hunter” and I am a “gatherer.” 😜
2. I swatched them out…not only to have a chart but to check on several properties. It shows me how easily the different colors dissolve on the paper but also how they “water down” into a wash near the bottom of the swatch. The black line shows their transparency. Most colors are highly pigmented, yet transparent, and easy to dissolve.
So far I am loving them!!! (More in next post.)
@tim_holtz @ranger_ink  #timholtz #distress #distresspencils #watercolorpencils
I have been doing a lot of watercoloring this summ I have been doing a lot of watercoloring this summer and thought that I might start posting again. (I haven’t shared my art work socially in over 2 years.) I painted these three Halloween Decoration Cards this morning using Windsor & Newton paints. They are from an older Michael’s class (free) taught by Mandy Peltier. They were a hoot to paint!
@mandypeltierartist @michaelsstores @winsorandnewton #winsorandnewton #makeitwithmichaels #michaelsclasses
Sometimes it is hard to step back, reevaluate, and Sometimes it is hard to step back, reevaluate, and admit that you need to see things differently!! These are powerful phrases that I intend to learn and to use gracefully.
—————
Thanks my friend for allowing me to share your wise words! ❤️@turnertr03
I am learning. I am listening. #blackouttuesday #a I am learning. I am listening.
#blackouttuesday #amplifymelanatedvoices
Load More... Follow on Instagram

Copyright Statement:

All content, including text, photos, and projects are the property of  Jo Ann Danchik. I encourage you to use this blog as inspiration for your personal projects. If you use any parts of this blog on another blog, website, or in any other public forum, please link back to this blog at jadanchik.com rather than copy and paste any of the information.


© [2017] · Jo Ann Danchik · All Rights Reserved.

Prev Next