• Home
  • About
  • Disclosure
  • FAQ
  • Contact Me
jadanchik.comjadanchik.com
  • Home
  • About
  • Disclosure
  • FAQ
  • Contact Me

Creative Sundays With Jo Ann: Bee Unique

Creative Sundays With Jo Ann: Bee Unique

Creative Sundays With Jo Ann: Bee Unique

February 11, 2018 Posted by Jo Ann Danchik Cards, Distress Inks, Encouragement Cards, Friend, General, Shaker Cards, Techniques, Watercolor

Something about bees fascinates me. They apparently like me as well, as evidenced by the large colony that set up residence in the eaves of our attic two years ago. Because of the alarming decline in the bee population we were told to call a bee keeper. Yes…a bee keeper! It was rather expensive to get rid of them, and we didn’t even get to keep the honey, but we are now bee free…except for all the Honey Bee Stamps in my studio of course!

____________________

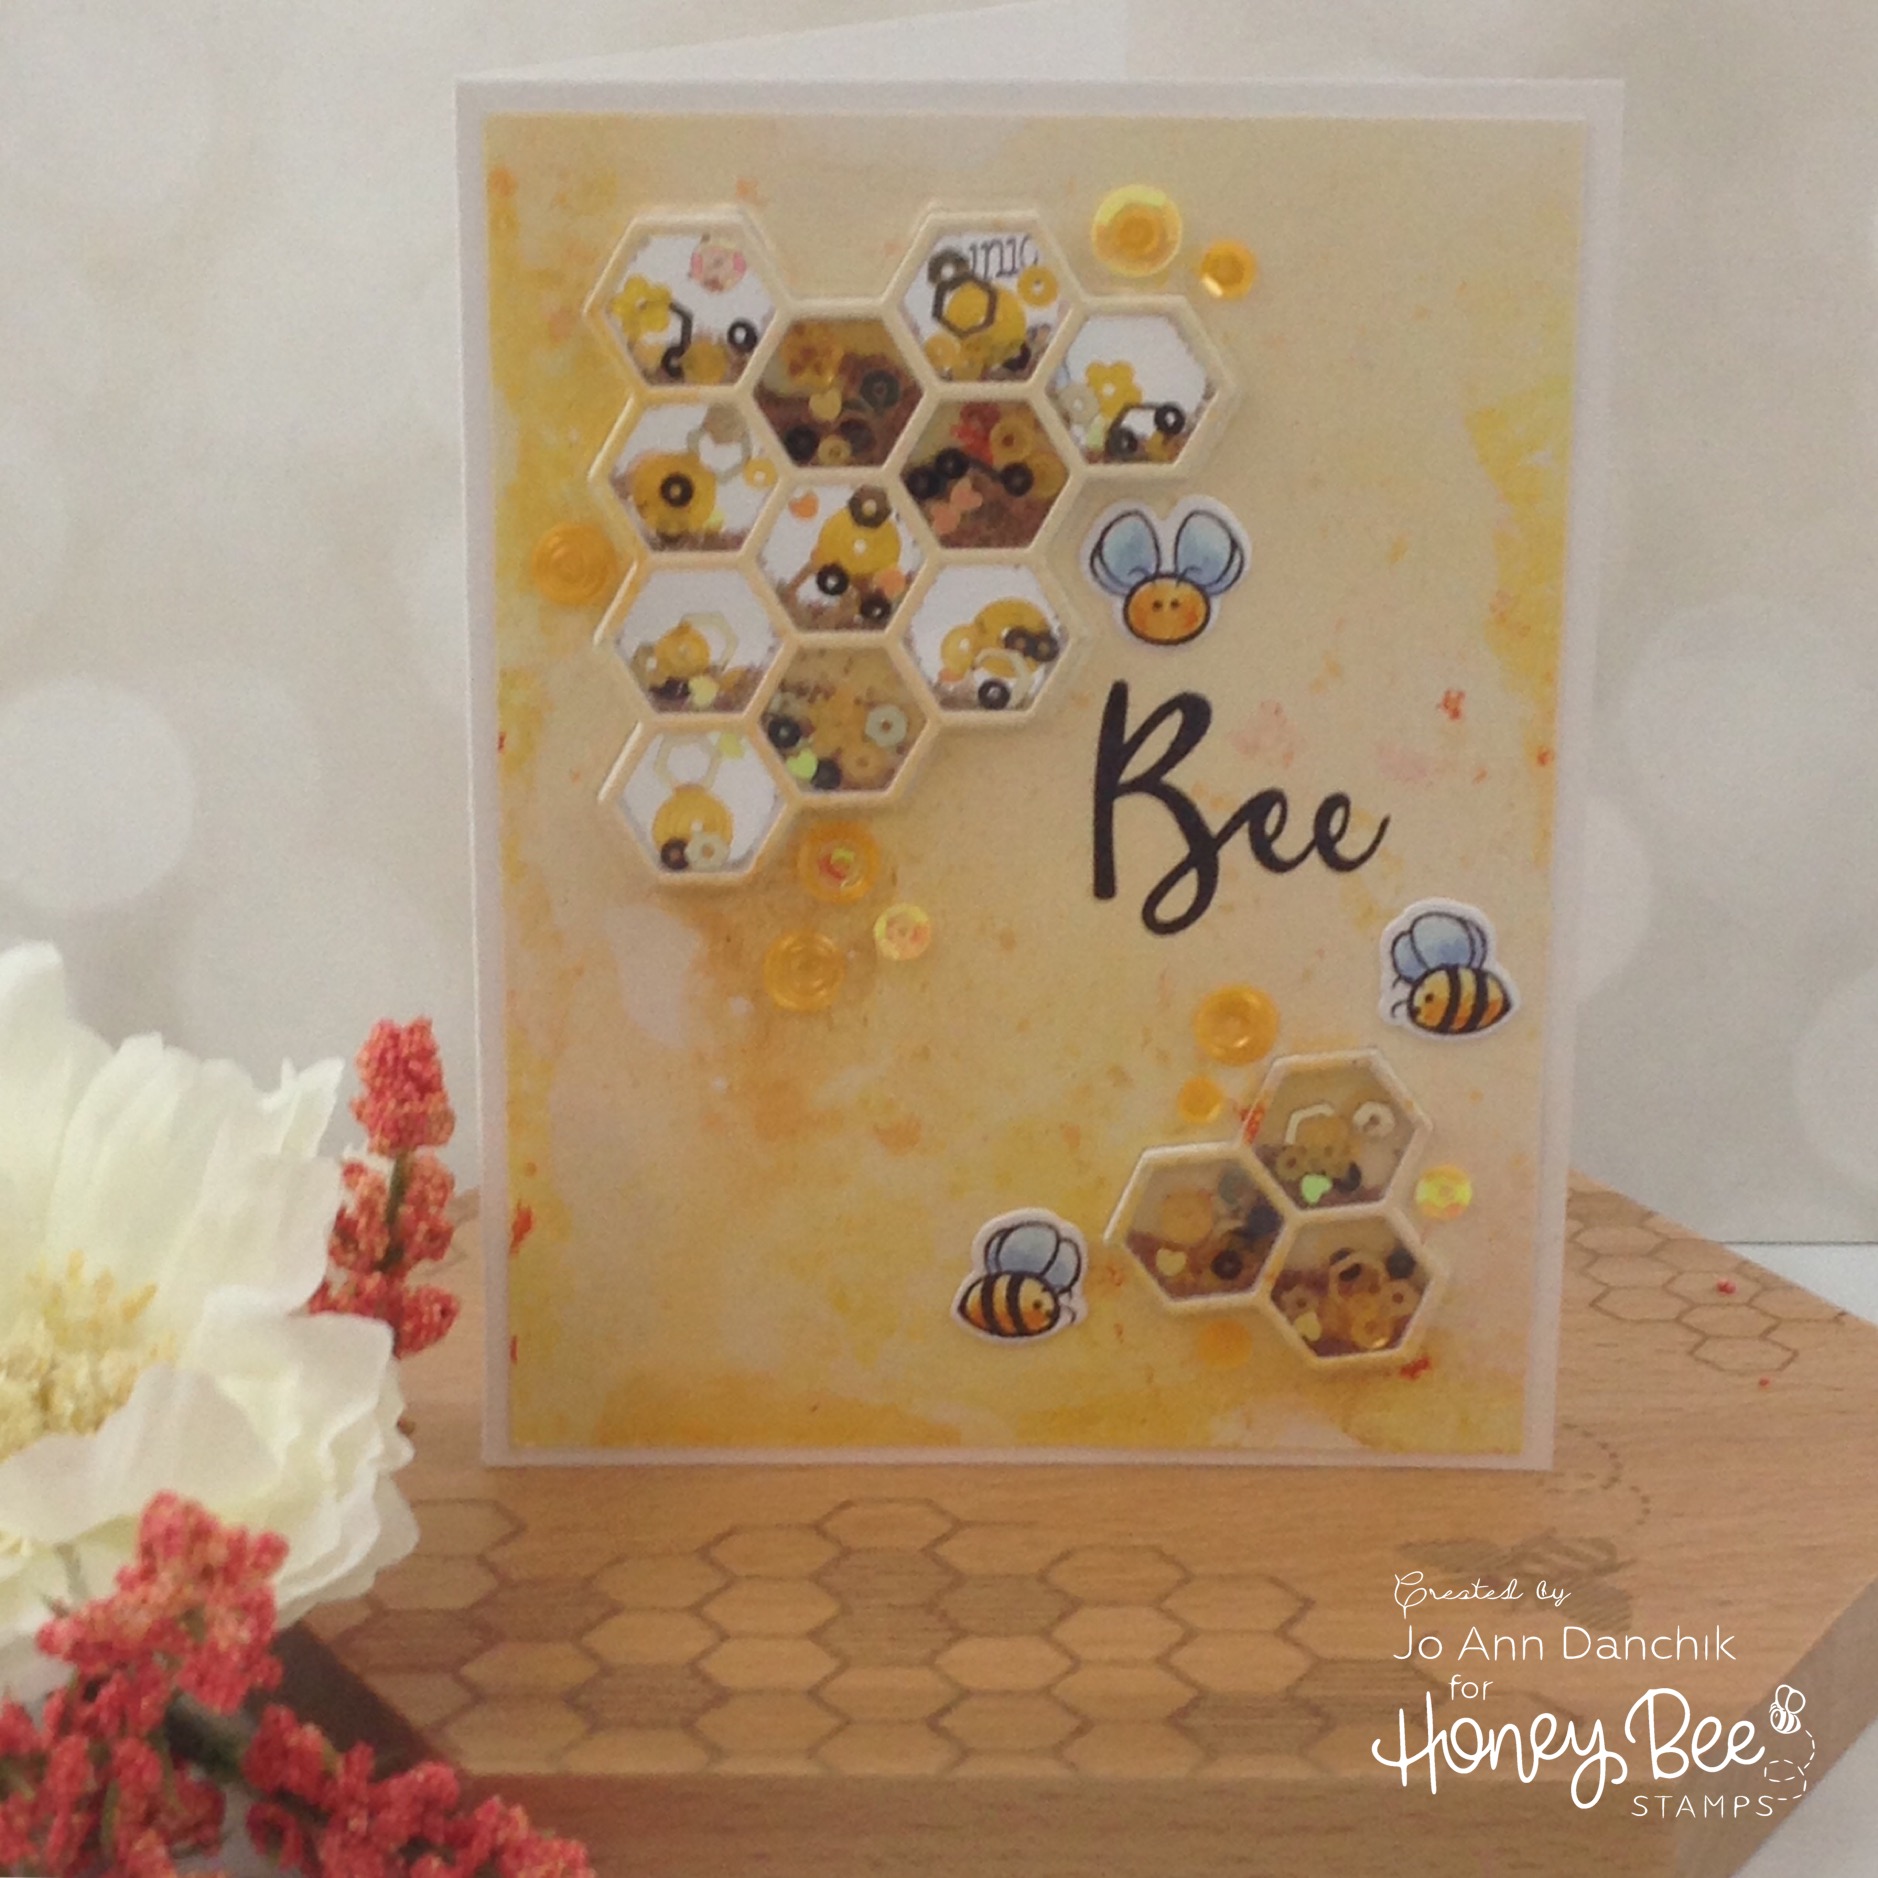
My idea for today was to make a shaker card. And then I had the crazy idea to make it see through. It posed a few challenges as to what order to proceed. I took a few missteps along the way so my hope is that this tutorial will make it easier for you.

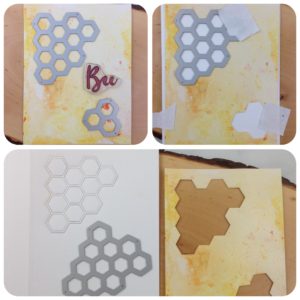
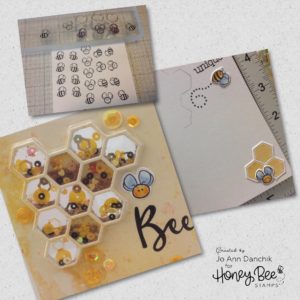
I started with a background that I made using Alcohol Inks and water. You can see the process on my blog here. I laid out two of the dies, from the Hexagon Bunches Die set, and a sentiment, from the Bee-You-Tiful Sentiment stamp set, to check the placement. (top left pic) I ran the dies through my die cutting machine. I lined the panel up with the front of my card base and secured it with some post-it tape. I placed the larger die back into the hole and ran it back through the machine. Don’t forget to leave the card base open! (top right pic) The end results are the bottom left and right pics.

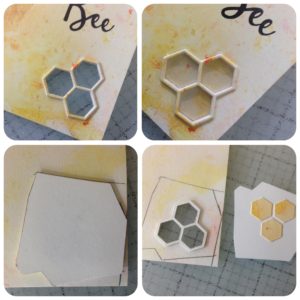
I cut five more sets of both dies out of Neenah Crest #110 cardstock. Stack and glue them together. I found it easiest to use a spray adhesive.

Take the small die stack and line it up in the bottom hole on the card front. Place a small piece of cardstock behind it and glue three colored pieces inside each hexagon. Turn it over and trace the outline of the cardstock. This will help you line it all up after you fill the shaker. You can see that I already have the colored piece on top of the stack, but that is because I had to go back and retake this picture to show you the process.

Now you can spray the top of both stacks and carefully lay them on top of pieces of acetate. I placed an acrylic block on top of them, to weigh them down, and let them dry. The spray takes an hour to cure properly. At this point everything felt sticky to me, and I had already pulled several things apart, so I left everything to dry for several hours. I washed my hands, made myself a cup of tea, and sat and thought about the best way to proceed. I also ate a cookie! LOL

When I came back, I sprayed the back of the colored top pieces and laid them carefully on top of the acetate. They were left to dry for an hour as well. In the meantime, I stamped the sentiment on the front. Once everything was set and dry I carefully cut the acetate around the hexagon stacks, using my Tim Holtz non stick Mini Snips.

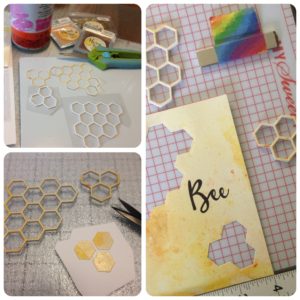
I slipped the stacks into the openings and flipped the panel over. To avoid any residual stickiness I heavily dusted the insides of each hexagon with an EK Success Powder Tool. I cleaned the powder off of the acetate with Q-tips soaked with Windex. Seriously…I don’t even clean my own windows but here I was cleaning out each hexagon with a Q-tip! (top left pic below)

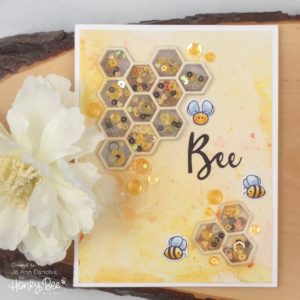
I filled each hexagon with a mixture of Raw Honey Mix Sequins, Gold Hexagons Sequins, and Bronze Cup Coffee Beans Shaker Set. Some of mine were different names but these are the same colors. It is really helpful to use a Double Edged Jewel Picker for the sequins. I have an old mini craft spoon that I used to scoop out the micro beads. Nuvo now makes a similar Craft Spoon. (top right pic below)

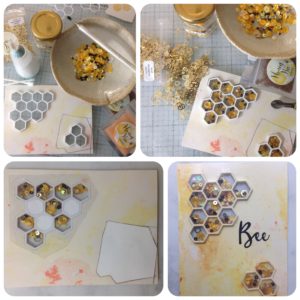
I added three colored pieces inside three random hexagons. I CAREFULLY glued the top edges of the stacks with Glossy Accents. I laid the small piece of cardstock on top of the small stack. If you line up your markings the hexagon backings will line up perfectly. I laid a piece of acetate on top of the large stack. I weighed them down and let them dry for several hours. (bottom left pic above)

THE ACETATE DID NOT STAY GLUED! Fortunately, I only lost one hexagon and was able to easily rebuild it. I tried Ranger’s Matte Multi Medium this time and put a fresh piece of acetate on top. This time is held tight! I taped the acetate to the back of the panel and flipped it over. (bottom right pic above)

I stamped an army of bees, with Ranger’s Archival Black ink on Tim Holtz Watercolor cardstock, using the small freebies that you get from the “Free Bee of the Month.” One is included with every order. If you spend $75 Honey Bee will also include the coordinating Die. Everything was watercolored using various Distress Inks. I love these bees! They are so cute…and they’re free! The Tim Holtz Sidekick is fantastic for cutting out all of these little pieces.

Inside, I stamped a sentiment, from the Bee-You-Tiful Sentiment stamp set, and a bee trail, from the Build-A-Bee stamp set. I glued some bees and an additional set of hexagons inside, and scattered sequins and bees on the front of the card.

I applied ample 1/4” Scor-Tape to the back of the panel and secured it to the cardbase. To finish the inside I added one more white cut out to the back of the see through window to cover the glue. I also added some of the left over colored pieces to cover the white backs of the three that I had filled in.

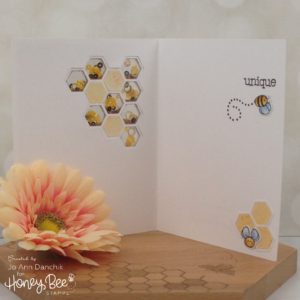
I love that the top shaker in this card is see through. It is Unique…just like the bee that is flying upside down! I left the bottom shaker solid so that there would be plenty of room to leave a message inside. Now that I have worked through all my missteps I look forward to making this card again. It is fairly easy, you just need to leave ample time to let the glue dry between steps.

Thanks for joining me today on this creative journey. You can follow my blog at jadanchik.com and my Instagram account at jadanchik.

Joyfully, Jo Ann

Supplies used:
The products used below are affiliate links. When using these links there is NO additional cost to you. Thank you for your support!

SaveSave

SaveSave

SaveSave

SaveSave

SaveSave

5
Share

You also might be interested in

Midweek Creations With Jo Ann: Hooray For Snailmail

Midweek Creations With Jo Ann: Hooray For Snailmail

Feb 6, 2019

I fell in love with the adorable Mr. Snailman Stamp[...]

Honey Bee Sneak Peek Day Two: Lady Bug Birthday

Honey Bee Sneak Peek Day Two: Lady Bug Birthday

Apr 27, 2018

It’s Release Week at Honey Bee Stamps. This is Day[...]

Midweek Creations With Jo Ann: Floral Cross Background

Midweek Creations With Jo Ann: Floral Cross Background

Jun 12, 2019

Hello my creative friends! I hope that your week is[...]

Hello......I'm Jo Ann

Christian, wife, and proud mother and grandma. I love to create art, cook, read a good book, take photos, and travel. -Enjoy life now...this is not a rehearsal!

....

While this blog is my personal journey I hope that you find something here that encourages you to unfurl your wings and be creative. Most everybody has a little childlike creativity in them just waiting to be set free. It doesn't have to be perfect... just create.

....

…………………………………………..

Enter your email address below to subscribe to this blog. You will receive notifications of new posts by email.


* indicates required


*Check your email to confirm subscription.

…………………………………………..

Categories

  • Action Card
  • Alcohol Inks
  • Altered Art
  • Backgrounds
  • Banners
  • Birthday
  • Bookmark
  • Cards
  • Chalk
  • Christmas
  • Colored Pencils
  • Congratulations
  • Copics
  • Distress Inks
  • Distress Oxide Inks
  • Easter
  • Embossing
  • Embossing Paste
  • Encouragement Cards
  • Fall
  • Father's Day
  • Foiling
  • Friend
  • General
  • Get Well
  • Gift Card Holder
  • Gift Tags
  • Graduation
  • Halloween
  • Hello
  • Holiday
  • Holiday Decor
  • Home Decor
  • Ink Blending
  • Interactive
  • Love
  • Markers
  • Masking
  • Miss You
  • Mother's Day
  • New Years
  • No Line Coloring
  • One Layer Cards
  • Ornaments
  • Patriotic
  • Placemats
  • Project
  • Scene Building
  • Shadow Box Cards
  • Shaker Cards
  • Shape Cards
  • Shared Thoughts
  • Shrinky Dinks
  • St. Patrick's Day
  • Stencils
  • Sympathy
  • Tags
  • Techniques
  • Texture Paste
  • Thank You
  • Tools
  • Uncategorized
  • Valentines
  • Wall Art
  • Watercolor
  • Wedding / Anniversary
  • Wreath Builder

Archives

  • June 2019
  • May 2019
  • April 2019
  • March 2019
  • February 2019
  • January 2019
  • December 2018
  • November 2018
  • October 2018
  • September 2018
  • August 2018
  • July 2018
  • June 2018
  • May 2018
  • April 2018
  • March 2018
  • February 2018
  • January 2018
  • December 2017

Recent Posts

  • Midweek Creations With Jo Ann: Floral Cross Background
  • Creative Sundays With Jo Ann: Goodbyes Are Not Forever
  • Midweek Creations With Jo Ann: Tropical Rainforest Shaker Card
  • National Honey Bee Day Blog Hop: You’re The Bee’s Knees
  • Creative Sundays With Jo Ann: Mandala Love

Tags

Angel Policy Stamp Set and Dies Backgrounds Bill The Bear Stamp Set and Dies Birthday Cardmaking Cards Christmas Cloud Border Die Set Colored Pencils Copics Design Team Die Cutting Dies Distress Inks Distress Oxide Inks Encouragement Feelin' Foxy Stamp Set and Dies Friend General Hand Drawing Heat Embossing Holiday Honey Bee Stamps Ink Blending Love Mae The Mouse Stamp Set and Dies Markers Masking Misti Tool New Release One Layer Cards Papercrafting Penny The Platypus Stamp Set and Dies Pinky The Pig Stamp and Die Set Projects Scene Building Snow Buddies Stamp Set and Dies Stamping Stamps Techniques Tools Trinity Stamps Tutorial Valentines Watercolor

Instagram Feed

jadanchik

A study in two different mediums… Tim Holtz WC D A study in two different mediums…
Tim Holtz WC Distress Pencils -v- Windsor & Newton Cotman WC Paints. 👩‍🎨🎨
—————
1. On the right is my original painting using W & N paints. I mixed equal parts Intense Blue and Cadmium Red Pale Hue to make black. I added additional water and thinned down washes to the bird to make the blooms and drips. As the paint thins out it creates lovely bluish tints.
2. On the left I used Tim’s WC Pencils. Distress Black Soot Ink has the unique property of maintaining its true black color as it’s thinned with water. The pencils do as well. Hmmm 🤔 To remedy this I quickly made a thin wash with Prize Ribbon while the painting was still wet. I alternated adding thinned blobs of the black and blue wash until I got the desired results.
—————
The more I study it…the more I prefer the raven on the left! Do you have a favorite?
—————
@tim_holtz @ranger_ink #timholtz #distress #distressinks #distresspencils
When you still have your new pencils out…but hav When you still have your new pencils out…but have no idea what to do with yourself. Cleaning your mess is not the answer. 😜 Then out of the corner of your eye you see Tim’s new “Unraveled” stamp set from Stamper’s Anonymous and some leftover scraps of watercolor paper. You just start to paint. Not sure what it will become when I fussy cut it. Mum(my)’s the word! 🤫
—————
(Swipe left for process pics)
1. Stamped with Antique Linen Distress ink for no line painting.
2. Antique Linen says it all. It’s in the name! But it was too dark so I made a wash and added some Picket Fence to lighten it. The brown is a mix of Walnut Stain and Black Soot.
—————
@tim_holtz @stampersanonymous @ranger_ink #timholtz #stampersanonymous #distress #distressinks #distresspencils
Still testing out the new Tim Holtz Distress Penci Still testing out the new Tim Holtz Distress Pencils. And how much fun is Tim’s new “The Scarecrow” stamp set from Stamper’s Anonymous? 🧡
—————
(Swipe right for process pics)
1. I stamped the scene using Antique Linen Distress Ink for no line painting with the watercolor pencils.
2. I realized that I put the sun on the right but the shadows on the scarecrow are also on the right. 🤔 Simple fix. I wet the shadow lines and lifted them with a paper towel. The crow and the plaid shirt are my favorite parts!!
3. I wanted to create some color blends so I made some heavily pigmented washes.
4. I wasn’t sure how to add a background at this point without a lot of masking. I carefully flooded the paper with water, avoiding the painted areas, and floated in several different light color washes.
—————
@tim_holtz @stampersanonymous @ranger_ink #timholtz #stampersanonymous #distressink #distress #distresspencils
I know…I know…no posts for 2+ years and now he I know…I know…no posts for 2+ years and now here I am posting again! 😜 I would have made this a reel, but after an hour of trying to figure it out I gave up. 🫤
—————
After painting the cat, crow, and bats yesterday I immediately thought of Tim Holtz’s new “Gothic Tapestry” skull from Stamper’s Anonymous. And I wanted to play with my new Distress Pencils some more…of course I did!
—————
I stamped a partial picture using Hickory Smoke Oxide ink. The watercolor paper (140lb cold press) was very textured so the impression is sketchy at best, but I didn’t need a lot of details.
—————
I love it! (Hubby thinks that it looks like Chewbacca!! 😂) 

We are going to need open stock on the black pencil!! @ranger_ink @tim_holtz @stampersanonymous #timholtz #stampersanonymous #distress #distresspencils #watercolopencils
Part Two I tested several of my favorite watercolo Part Two
I tested several of my favorite watercolor pencil methods still using the Windsor & Newton professional cold press 140 lb watercolor paper. High quality paper is oftentimes more important than the quality of paint in getting good results.
1. The first swatch is pencil scribbled directly onto the paper and activated with a water brush. The Seedless Preserves is highly pigmented but a little harder to break down and dissolve. Darker reds and purples sometimes behave this way.
2. The second swatch is dipping the tip of the pencil in the water and smoothing with a wet brush. This delivers a large pigment load. You can also run a wet brush over the tip of the pencil  and then paint. These offer very smooth results.
3. The third swatch is a wash. I like to create a controlled wash. Yes…you can do this easily with pencils. Add a few drops of water to a porcelain well. Run your water brush over the tip of the pencil and swirl it into the water. Repeat multiple times until you get the paint to water ratio that you want. With a wash you can add many layers to your painting.
4. The top picture shows how well the colors lift. This is useful info for adding highlights and shading or if you accidentally drop color in an unwanted area. Being Distress Inks, they don’t appear to react quite the same to water droplets as regular Distress Inks. They do lift when dry, but some colors stain more than others.
(continued in comments)
timholtz @ranger_ink #timholtz #distress #distresspencils #watercolorpencils
Part One I have been watching for the UPS driver a Part One
I have been watching for the UPS driver all week. When my package of Distress Pencils arrived yesterday afternoon I nearly snatched it from their hands! 😂
I work a lot with different watercolor paints, pencils, and crayons so I was eager to play with them. I used Windsor & Newton professional cold press 140 lb watercolor paper to test them. It’s bumpy so you get a lot of white space when you scribble on the pigment.
1. As I tend to layer colors I immediately put them into color families. I know that you like to dig for them Tim but I need them in color order and don’t have your patience. You are a “hunter” and I am a “gatherer.” 😜
2. I swatched them out…not only to have a chart but to check on several properties. It shows me how easily the different colors dissolve on the paper but also how they “water down” into a wash near the bottom of the swatch. The black line shows their transparency. Most colors are highly pigmented, yet transparent, and easy to dissolve.
So far I am loving them!!! (More in next post.)
@tim_holtz @ranger_ink  #timholtz #distress #distresspencils #watercolorpencils
I have been doing a lot of watercoloring this summ I have been doing a lot of watercoloring this summer and thought that I might start posting again. (I haven’t shared my art work socially in over 2 years.) I painted these three Halloween Decoration Cards this morning using Windsor & Newton paints. They are from an older Michael’s class (free) taught by Mandy Peltier. They were a hoot to paint!
@mandypeltierartist @michaelsstores @winsorandnewton #winsorandnewton #makeitwithmichaels #michaelsclasses
Sometimes it is hard to step back, reevaluate, and Sometimes it is hard to step back, reevaluate, and admit that you need to see things differently!! These are powerful phrases that I intend to learn and to use gracefully.
—————
Thanks my friend for allowing me to share your wise words! ❤️@turnertr03
I am learning. I am listening. #blackouttuesday #a I am learning. I am listening.
#blackouttuesday #amplifymelanatedvoices
Load More... Follow on Instagram

Copyright Statement:

All content, including text, photos, and projects are the property of  Jo Ann Danchik. I encourage you to use this blog as inspiration for your personal projects. If you use any parts of this blog on another blog, website, or in any other public forum, please link back to this blog at jadanchik.com rather than copy and paste any of the information.


© [2017] · Jo Ann Danchik · All Rights Reserved.

Prev Next