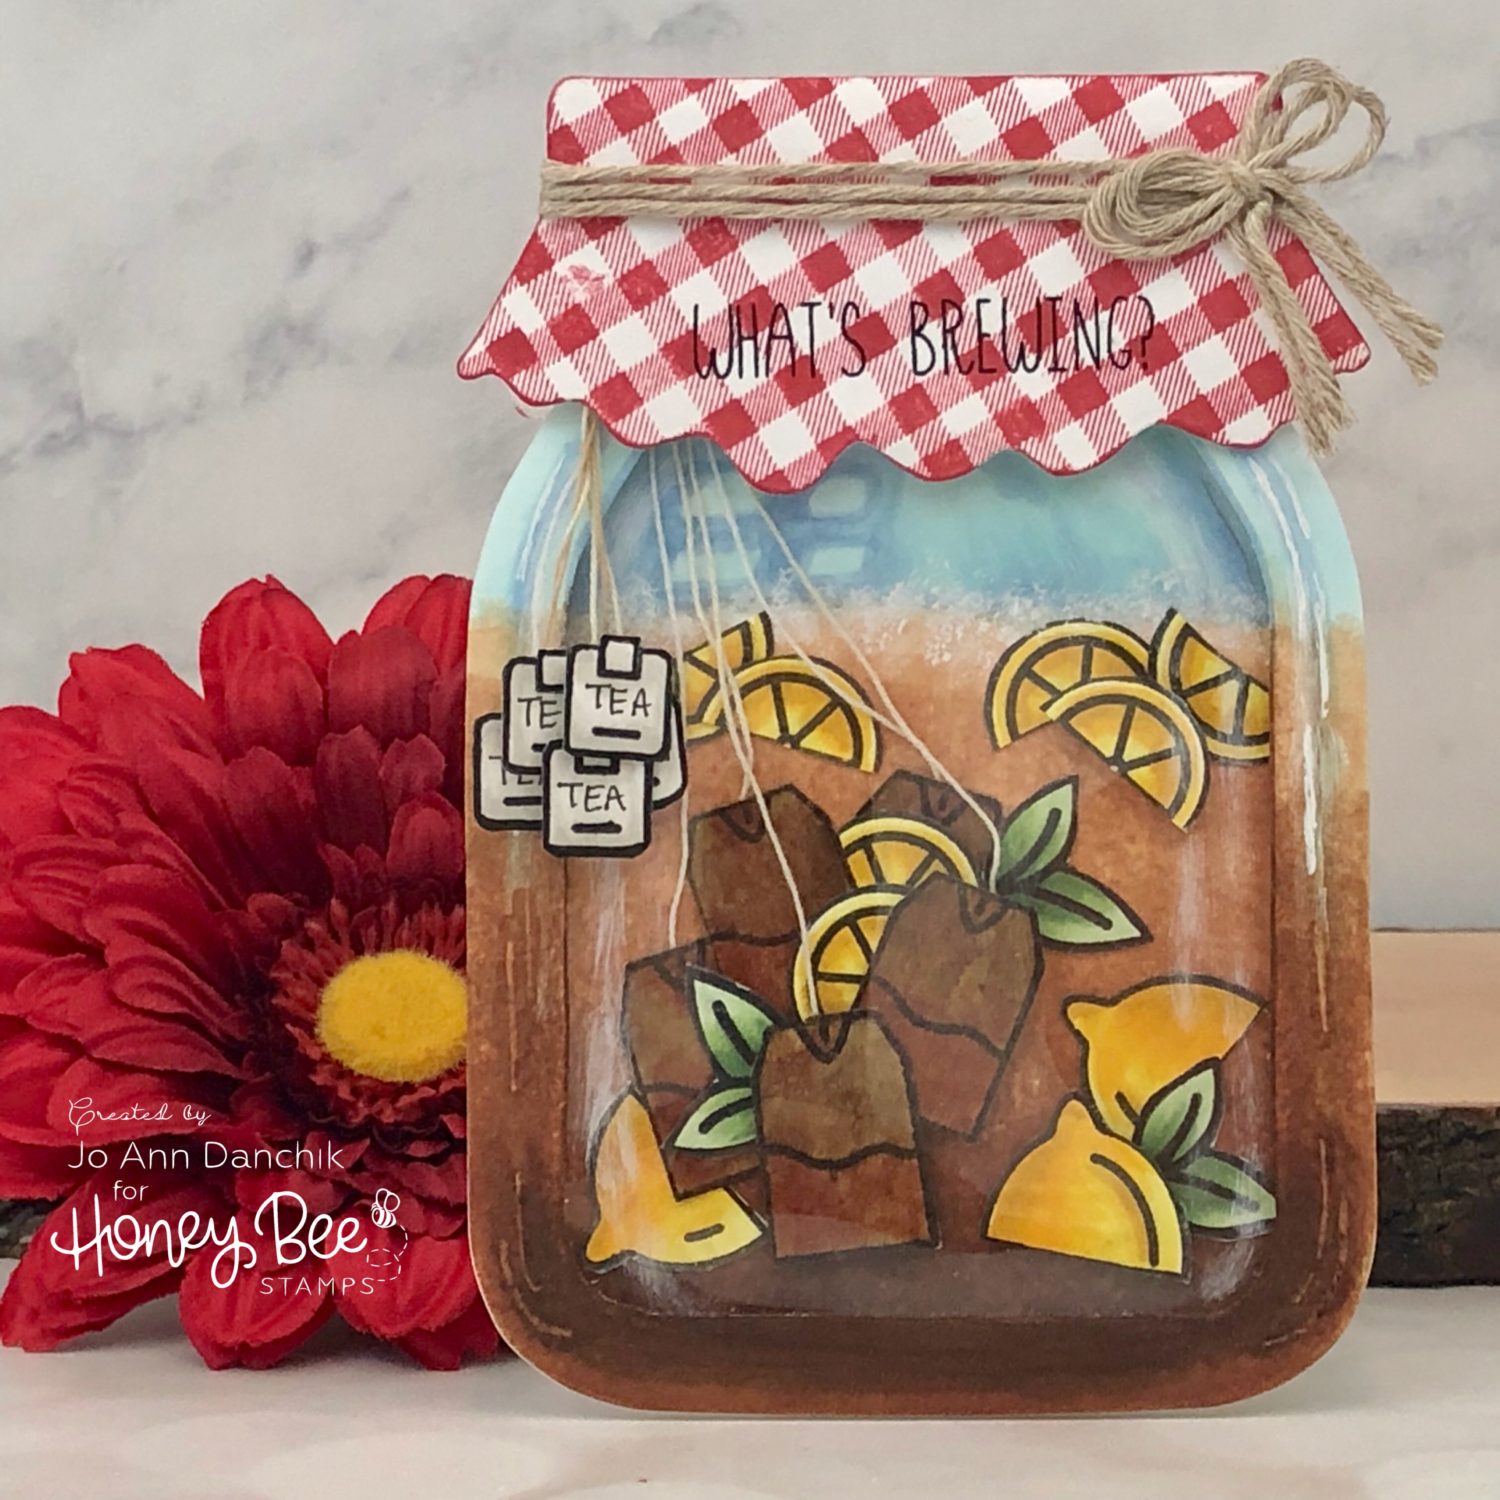
Creative Sundays With Jo Ann: What’s Brewing?
Have you ever made sun tea? In the 70’s it was a popular fad to take a large mouth gallon pickle jar, fill it with water and a couple of family size tea bags, and place it outside on a sunny day. Our first use of solar power! It was proclaimed to be the best way to make tea. It is still made today, but most people use fancier jars that come equipped with a push button pouring spout. It’s summer, so if you open my refrigerator you are sure to find a gallon jug of tea and a gallon jug of homemade lemonade. I also have fresh spearmint in my garden.
____________________
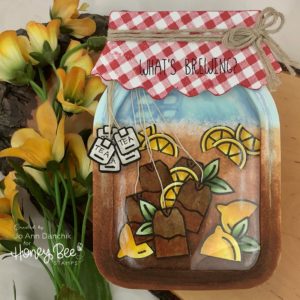
The new Mason Jar Card Die Set is fabulous! I can envision filling it with bugs, buttons, candy, flowers, etc. You are only limited by your imagination!
To start, I used the new Bitty Patterns Stamp Set, and Hero Arts Strawberry Hybrid Ink, to create a repeating gingham pattern. Two jar lids were cut using the cloth lid die from the Mason Jar Card Die Set.
I used #110 Neenah Solar Crest Cardstock for the base of the card. Everything else was cut from #80 Cardstock.
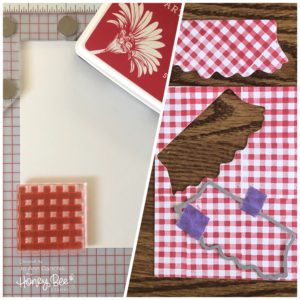
I cut two sets of the base, from the Mason Jar Card Die Set, as well. One set was cut in half. I drew a line, about 1/4” wide (ish), inside one piece and cut it out. (I kept the cut out piece as a pattern for future use.) I laid the cutout over the second piece and made a light pencil mark to delineate the tea line.

I took a used (dry) tea bag and opened it up. I stamped some tea bags, from the Tea Time Stamp Set, using Ranger Archival Black Ink. They were watercolored using Tea Dye…(what other color would you use?) LOL…and Rusty Hinge Distress Inks.
I glued them onto a piece of Khaki cardstock using Distress Collage Medium. I added a coat on top as well.
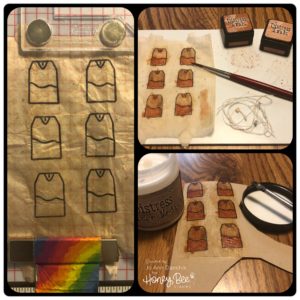
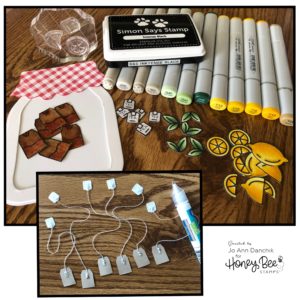
While the tea bags dried I stamped multiple images of lemons, lemon slices, tea bag tags, and mint leaves, using Simon Says Stamp Intense Black Ink. All these images can be found in the Tea Time Stamp Set. I used Copic Markers to color them. There is a coordinating Tea Time Die Set, but I fussy cut them. I wrote the word Tea on each tag with a .1 Copic Multiliner. I went back over many of the lines with a .5 Copic Multiliner.
Lemons: Y13, Y15, Y18, Y19, Y26
Tea Tags: Q00, W0, W1, W2
Mint: G40, G43, G46
I took the strings, from my used tea bags, and attached them to the colored tea bags and tags, using a Lawn Fawn Glue Tube.
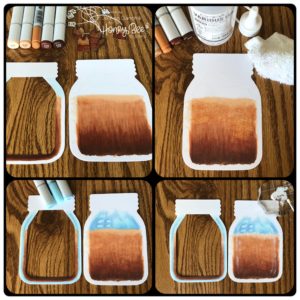
I colored the tea using E30, E33, E35, E39, and E59. It was really streaky and I didn’t want to spend a lot of time blending the colors (upper left pic) so I put some Colorless Blending Solution on a piece of washcloth and dabbed it on for a couple of seconds in each area. This is a trick that I learned in my Copic Certification classes, and again from Kathy Racoosin. I left some of it undone so that you could see the difference. (upper right pic)
The glass was colored using B0000, B000, and B41. (lower left pic)
I stippled on some white acrylic paint, with a small stiff brush, to add some foam to the top of the tea and to add reflection highlights along the edges. (lower right pic)
I arranged all the small pieces inside the jar. They were adhered using Lawn Fawn Glue. Some pieces had Scotch Foam Tape added for extra dimension. I glued the strings together at the top and cut the tags off. I added half of a lemon and a mint leaf to the inside.
I had not intended to add acetate to the front but decided that it would really give the card a more finished look. It was added using liquid glue. Scotch Foam Tape was added on top.
The sentiment, from the Perfect Blend Stamp Set, was stamped onto the jar lid. Twine was wrapped around both lids and secured in the back. An additional tea bag, lemon slice, and mint leaf were added to the back, along with my personal stamp.

The front panel was added to the base, using a tape runner, and then the cutout piece was put on top. The tea tags were glued to the top edge. To finish, I added the lids to both the front and back.
After I assembled the card, the coloring on the outside cutout window piece just didn’t look right to me. I went back and added more of the brown Copics over the blue. You can see it in the final pictures. I am much happier with the results!
This card could easily have been made into a shaker card. As I said, I have saved the part that I cut out to form the window and will use it as a template to cut out future windows.
Thank you for joining me today on this creative journey!
Joyfully,
Jo Ann
Supplies used:
The products that I used are listed below in compensated affiliate links. You can click the icon of your choice, below the product picture, to go directly to your favorite shop. There is NO additional cost to you when using these links. Thank you for your support!