• Home
  • About
  • Disclosure
  • FAQ
  • Contact Me
jadanchik.comjadanchik.com
  • Home
  • About
  • Disclosure
  • FAQ
  • Contact Me

National Tea Day Collaboration Blog Hop: Tea For Two

National Tea Day Collaboration Blog Hop: Tea For Two

National Tea Day Collaboration Blog Hop: Tea For Two

April 21, 2019 Posted by Jo Ann Danchik Alcohol Inks, Backgrounds, Cards, Copics, Embossing, Friend, Love, Masking, Techniques

Honey Bee Stamps is doing a collaboration hop with Coffee Loving Cardmakers to celebrate National Tea Day. This day is celebrated every year in the UK and the US on April 21st. Join us as we celebrate our love of tea!

(Products highlighted in teal are active links to the shop.)

Before we get started, I thought that I would share some fun tea related information.

1. Tea is the second most consumed drink in the world…after water. Well, tea IS hot water with leaves in it…but still.
2. Some people drink tea to start their day and some drink teas to help them sleep.
3. Like Captain John Luc Picard, I also like Earl Gray…hot. But I add milk.
4. According to my British relatives, proper tea should only be consumed in a china cup…never a mug. A mug is for coffee.
5. Milk is poured into the teacup before adding the hot brewed tea.
6. You either drink your tea with milk or with lemon…never both!

____________________

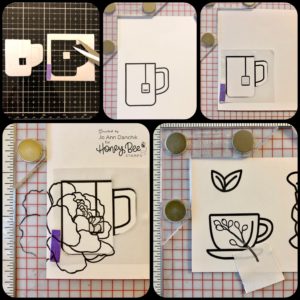
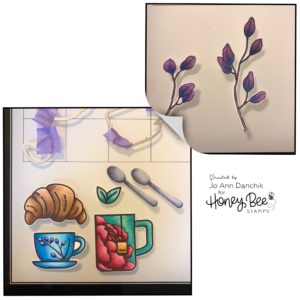
Okay, moving on to the card. Today’s card features the Tea Time Stamp Set. I stamped the mug, mint leaf, and croissant onto #80 Neenah cardstock, using copic friendly Gina K Black Amalgam Ink. I also stamped the mug onto Inkadinkado Masking Paper. The inside was cut out. I placed the outside of the mask around the mug. I also masked off the tea bag. (top row pics)

I used one of the blooms, from the new Spring Peony Stamp Set, to stamp inside the mug. I also stamped the cup from the Coffee Break Stamp Set. I only needed a small piece of Post-It tape to mask off the china cup to stamp a berry stem from the Spring Peony Stamp Set. (bottom row pics)

All the images were colored using Copic Markers. I have included the colors that I used for those who like to know.

Mug
R81, R83, R85, R89
BG10, BG11, BG13, BG15
E51, E53, E55 “TEA” was added with a 0.2 Copic Multiliner
China Cup
B60, B63, B66, B69
B000, B00, B02. B05 Highlight added with White Gelly Roll Pen
Leaves
V12, V15, V17, B05, E74
Mint Leaves
BG10, BG11, BG13, BG15
Spoons (I ended up not using these)
C1, C3, C5
Croissant
E51, E53, E55, E57, E59

To give the croissant a more realistic look, I wet a piece of knubby rag with colorless 0 blending solution and touched it briefly to the image. Heat it quickly with a heat gun to keep the texture intact. Repeat the process until you have the look that you like.

The china cup was cut with the coordinating Coffee Break Die Set. The mug, spoons, and croissant were cut with the coordinating Tea Time Die Set. The leaves were fussy cut. There is a coordinating Spring Peony Die Set, but I didn’t have it at the time.

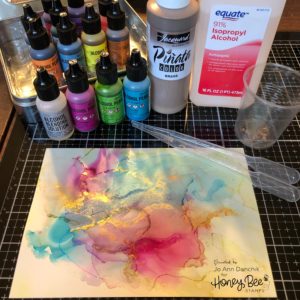
For the background, I started with a piece of white Yupo paper. It comes in a variety of sizes and thicknesses. I have listed several choices below for your convenience. I used the Tim Holtz heavyweight brand.

I played around with the new Tim Holtz Intrigue, Sublime, and Tranquil Pearl Alcohol Inks. As I added them I thinned them down with Alcohol Blending Solution and blew them around the paper. I used a pipette to add 91% Isopropyl Alcohol around the hard edges to thin it out even more. 

I put some Jacquard Brass Piñata Alcohol Ink into a small cup. I buy these disposable cups in bulk and use them a lot in the studio. They are great for dyeing glitter, mixing colors, and paint pouring. I added drops of the Brass and thinned it out with more of the Isopropyl Alcohol. When I was happy with the results I used a heat gun to set it all, being careful not to melt the Yupo paper. I love the way the background sparkles and shimmers!

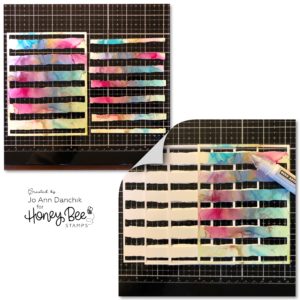
I cut the background with the new Watercolor Lines Die. I will save the inside lines for another project. I really love this die. I used it yesterday as well for another blog hop. I cut three additional pieces and glued them together, with a Hero Arts Glue Pen, for a dimensional look. This is so much easier than cutting strips of foam tape!!!

I used the Perfect Blend Stamp Set for the sentiment. It was stamped on Vellum using Versafine Clair Nocturne Pigment Ink and heat embossed with Hero Arts Clear Embossing Powder. Be sure to use an anti static tool before stamping. (oops…I forgot to take a pic)

The background was added to a piece of Hero Arts Black cardstock. The whole panel was added to a #110 Neenah cardstock folded card base, using a Kokuyo Tape Runner, and the images were glued on. Small drops of glue were carefully added behind the words to adhere the sentiment.

I really love the elegant look of this background. The table is set and ready to share a cup of tea and croissant with a loved one or special friend!

Prizes!!

Of course there are prizes! Honey Bee is giving away a $30 Gift Certificate to the shop on both their blog and The Coffee Loving Cardmakers blog. Commenting will be open until Friday, April 26 at 11:59 pm PDT. Be sure to visit each blog along the hop and leave a comment for a chance to win!

I have included the links for the Design Team members from Honey Bee Stamps, as well as Coffee Loving Cardmakers. Grab a cup of tea and visit them all for lots of inspiration. 

Honey Bee Stamps  
Brenda Noelke
Carol Hintermeier
Carrie Bryant
Amy Rysavy  
Galina Filippenko
Carly Minner
Keiko Ichikawa  
Jana Millen
Bibiana Cameron
Kelly Latevola
Jo Ann Danchik (you are here)
Alba Castejon

Coffee Loving Cardmaker’s Blog
Lisa Bzibziak
Helen Gullett
Katie Brooks
Dana Warren
Erin Thiem
Kerry Urbatch
Laurel Seabrook
Kathy Schweinfurth  
Amy Tsuruta  

As always, thank you for sharing a bit of your time with me today! Don’t forget to leave a comment for a chance to win.

Joyfully,
Jo Ann

Supplies used:
The products that I used are listed below in compensated affiliate links. You can click the icon of your choice, below the product picture, to go directly to your favorite shop. There is NO additional cost to you when using these links. Thank you for your support!


3
Share

You also might be interested in

Honey Bee Stamps and Heffy Doodle: Collaboration Blog Hop

Honey Bee Stamps and Heffy Doodle: Collaboration Blog Hop

Sep 21, 2018

Honey Bee Stamps is joining together with Heffy Doodle Stamps[...]

Creative Sundays with Jo Ann: Bushel and A Peck – One Stamp…Two Ways.

Creative Sundays with Jo Ann: Bushel and A Peck – One Stamp…Two Ways.

Jan 1, 2018

This post was originally seen on the Honey Bee Stamp[...]

Creative Sundays With Jo Ann: Tea Light Table Decoration

Creative Sundays With Jo Ann: Tea Light Table Decoration

Feb 10, 2019

I know that it is still Winter, and many people[...]

Hello......I'm Jo Ann

Christian, wife, and proud mother and grandma. I love to create art, cook, read a good book, take photos, and travel. -Enjoy life now...this is not a rehearsal!

....

While this blog is my personal journey I hope that you find something here that encourages you to unfurl your wings and be creative. Most everybody has a little childlike creativity in them just waiting to be set free. It doesn't have to be perfect... just create.

....

…………………………………………..

Enter your email address below to subscribe to this blog. You will receive notifications of new posts by email.


* indicates required


*Check your email to confirm subscription.

…………………………………………..

Categories

  • Action Card
  • Alcohol Inks
  • Altered Art
  • Backgrounds
  • Banners
  • Birthday
  • Bookmark
  • Cards
  • Chalk
  • Christmas
  • Colored Pencils
  • Congratulations
  • Copics
  • Distress Inks
  • Distress Oxide Inks
  • Easter
  • Embossing
  • Embossing Paste
  • Encouragement Cards
  • Fall
  • Father's Day
  • Foiling
  • Friend
  • General
  • Get Well
  • Gift Card Holder
  • Gift Tags
  • Graduation
  • Halloween
  • Hello
  • Holiday
  • Holiday Decor
  • Home Decor
  • Ink Blending
  • Interactive
  • Love
  • Markers
  • Masking
  • Miss You
  • Mother's Day
  • New Years
  • No Line Coloring
  • One Layer Cards
  • Ornaments
  • Patriotic
  • Placemats
  • Project
  • Scene Building
  • Shadow Box Cards
  • Shaker Cards
  • Shape Cards
  • Shared Thoughts
  • Shrinky Dinks
  • St. Patrick's Day
  • Stencils
  • Sympathy
  • Tags
  • Techniques
  • Texture Paste
  • Thank You
  • Tools
  • Uncategorized
  • Valentines
  • Wall Art
  • Watercolor
  • Wedding / Anniversary
  • Wreath Builder

Archives

  • June 2019
  • May 2019
  • April 2019
  • March 2019
  • February 2019
  • January 2019
  • December 2018
  • November 2018
  • October 2018
  • September 2018
  • August 2018
  • July 2018
  • June 2018
  • May 2018
  • April 2018
  • March 2018
  • February 2018
  • January 2018
  • December 2017

Recent Posts

  • Midweek Creations With Jo Ann: Floral Cross Background
  • Creative Sundays With Jo Ann: Goodbyes Are Not Forever
  • Midweek Creations With Jo Ann: Tropical Rainforest Shaker Card
  • National Honey Bee Day Blog Hop: You’re The Bee’s Knees
  • Creative Sundays With Jo Ann: Mandala Love

Tags

Angel Policy Stamp Set and Dies Backgrounds Bill The Bear Stamp Set and Dies Birthday Cardmaking Cards Christmas Cloud Border Die Set Colored Pencils Copics Design Team Die Cutting Dies Distress Inks Distress Oxide Inks Encouragement Feelin' Foxy Stamp Set and Dies Friend General Hand Drawing Heat Embossing Holiday Honey Bee Stamps Ink Blending Love Mae The Mouse Stamp Set and Dies Markers Masking Misti Tool New Release One Layer Cards Papercrafting Penny The Platypus Stamp Set and Dies Pinky The Pig Stamp and Die Set Projects Scene Building Snow Buddies Stamp Set and Dies Stamping Stamps Techniques Tools Trinity Stamps Tutorial Valentines Watercolor

Instagram Feed

jadanchik

A study in two different mediums… Tim Holtz WC D A study in two different mediums…
Tim Holtz WC Distress Pencils -v- Windsor & Newton Cotman WC Paints. 👩‍🎨🎨
—————
1. On the right is my original painting using W & N paints. I mixed equal parts Intense Blue and Cadmium Red Pale Hue to make black. I added additional water and thinned down washes to the bird to make the blooms and drips. As the paint thins out it creates lovely bluish tints.
2. On the left I used Tim’s WC Pencils. Distress Black Soot Ink has the unique property of maintaining its true black color as it’s thinned with water. The pencils do as well. Hmmm 🤔 To remedy this I quickly made a thin wash with Prize Ribbon while the painting was still wet. I alternated adding thinned blobs of the black and blue wash until I got the desired results.
—————
The more I study it…the more I prefer the raven on the left! Do you have a favorite?
—————
@tim_holtz @ranger_ink #timholtz #distress #distressinks #distresspencils
When you still have your new pencils out…but hav When you still have your new pencils out…but have no idea what to do with yourself. Cleaning your mess is not the answer. 😜 Then out of the corner of your eye you see Tim’s new “Unraveled” stamp set from Stamper’s Anonymous and some leftover scraps of watercolor paper. You just start to paint. Not sure what it will become when I fussy cut it. Mum(my)’s the word! 🤫
—————
(Swipe left for process pics)
1. Stamped with Antique Linen Distress ink for no line painting.
2. Antique Linen says it all. It’s in the name! But it was too dark so I made a wash and added some Picket Fence to lighten it. The brown is a mix of Walnut Stain and Black Soot.
—————
@tim_holtz @stampersanonymous @ranger_ink #timholtz #stampersanonymous #distress #distressinks #distresspencils
Still testing out the new Tim Holtz Distress Penci Still testing out the new Tim Holtz Distress Pencils. And how much fun is Tim’s new “The Scarecrow” stamp set from Stamper’s Anonymous? 🧡
—————
(Swipe right for process pics)
1. I stamped the scene using Antique Linen Distress Ink for no line painting with the watercolor pencils.
2. I realized that I put the sun on the right but the shadows on the scarecrow are also on the right. 🤔 Simple fix. I wet the shadow lines and lifted them with a paper towel. The crow and the plaid shirt are my favorite parts!!
3. I wanted to create some color blends so I made some heavily pigmented washes.
4. I wasn’t sure how to add a background at this point without a lot of masking. I carefully flooded the paper with water, avoiding the painted areas, and floated in several different light color washes.
—————
@tim_holtz @stampersanonymous @ranger_ink #timholtz #stampersanonymous #distressink #distress #distresspencils
I know…I know…no posts for 2+ years and now he I know…I know…no posts for 2+ years and now here I am posting again! 😜 I would have made this a reel, but after an hour of trying to figure it out I gave up. 🫤
—————
After painting the cat, crow, and bats yesterday I immediately thought of Tim Holtz’s new “Gothic Tapestry” skull from Stamper’s Anonymous. And I wanted to play with my new Distress Pencils some more…of course I did!
—————
I stamped a partial picture using Hickory Smoke Oxide ink. The watercolor paper (140lb cold press) was very textured so the impression is sketchy at best, but I didn’t need a lot of details.
—————
I love it! (Hubby thinks that it looks like Chewbacca!! 😂) 

We are going to need open stock on the black pencil!! @ranger_ink @tim_holtz @stampersanonymous #timholtz #stampersanonymous #distress #distresspencils #watercolopencils
Part Two I tested several of my favorite watercolo Part Two
I tested several of my favorite watercolor pencil methods still using the Windsor & Newton professional cold press 140 lb watercolor paper. High quality paper is oftentimes more important than the quality of paint in getting good results.
1. The first swatch is pencil scribbled directly onto the paper and activated with a water brush. The Seedless Preserves is highly pigmented but a little harder to break down and dissolve. Darker reds and purples sometimes behave this way.
2. The second swatch is dipping the tip of the pencil in the water and smoothing with a wet brush. This delivers a large pigment load. You can also run a wet brush over the tip of the pencil  and then paint. These offer very smooth results.
3. The third swatch is a wash. I like to create a controlled wash. Yes…you can do this easily with pencils. Add a few drops of water to a porcelain well. Run your water brush over the tip of the pencil and swirl it into the water. Repeat multiple times until you get the paint to water ratio that you want. With a wash you can add many layers to your painting.
4. The top picture shows how well the colors lift. This is useful info for adding highlights and shading or if you accidentally drop color in an unwanted area. Being Distress Inks, they don’t appear to react quite the same to water droplets as regular Distress Inks. They do lift when dry, but some colors stain more than others.
(continued in comments)
timholtz @ranger_ink #timholtz #distress #distresspencils #watercolorpencils
Part One I have been watching for the UPS driver a Part One
I have been watching for the UPS driver all week. When my package of Distress Pencils arrived yesterday afternoon I nearly snatched it from their hands! 😂
I work a lot with different watercolor paints, pencils, and crayons so I was eager to play with them. I used Windsor & Newton professional cold press 140 lb watercolor paper to test them. It’s bumpy so you get a lot of white space when you scribble on the pigment.
1. As I tend to layer colors I immediately put them into color families. I know that you like to dig for them Tim but I need them in color order and don’t have your patience. You are a “hunter” and I am a “gatherer.” 😜
2. I swatched them out…not only to have a chart but to check on several properties. It shows me how easily the different colors dissolve on the paper but also how they “water down” into a wash near the bottom of the swatch. The black line shows their transparency. Most colors are highly pigmented, yet transparent, and easy to dissolve.
So far I am loving them!!! (More in next post.)
@tim_holtz @ranger_ink  #timholtz #distress #distresspencils #watercolorpencils
I have been doing a lot of watercoloring this summ I have been doing a lot of watercoloring this summer and thought that I might start posting again. (I haven’t shared my art work socially in over 2 years.) I painted these three Halloween Decoration Cards this morning using Windsor & Newton paints. They are from an older Michael’s class (free) taught by Mandy Peltier. They were a hoot to paint!
@mandypeltierartist @michaelsstores @winsorandnewton #winsorandnewton #makeitwithmichaels #michaelsclasses
Sometimes it is hard to step back, reevaluate, and Sometimes it is hard to step back, reevaluate, and admit that you need to see things differently!! These are powerful phrases that I intend to learn and to use gracefully.
—————
Thanks my friend for allowing me to share your wise words! ❤️@turnertr03
I am learning. I am listening. #blackouttuesday #a I am learning. I am listening.
#blackouttuesday #amplifymelanatedvoices
Load More... Follow on Instagram

Copyright Statement:

All content, including text, photos, and projects are the property of  Jo Ann Danchik. I encourage you to use this blog as inspiration for your personal projects. If you use any parts of this blog on another blog, website, or in any other public forum, please link back to this blog at jadanchik.com rather than copy and paste any of the information.


© [2017] · Jo Ann Danchik · All Rights Reserved.

Prev Next