• Home
  • About
  • Disclosure
  • FAQ
  • Contact Me
jadanchik.comjadanchik.com
  • Home
  • About
  • Disclosure
  • FAQ
  • Contact Me

Saturday Creations with Jo Ann: More Shrinky Dink Ornaments

Saturday Creations with Jo Ann: More Shrinky Dink Ornaments

Saturday Creations with Jo Ann: More Shrinky Dink Ornaments

January 5, 2018 Posted by Jo Ann Danchik Christmas, Colored Pencils, Holiday, Holiday Decor, Markers, Ornaments, Project, Shrinky Dinks, Techniques

This post was originally seen on the Honey Bee Stamp Blog on 12/23/17. It is being added to my personal blog so that it can be archived. Enjoy!

———————

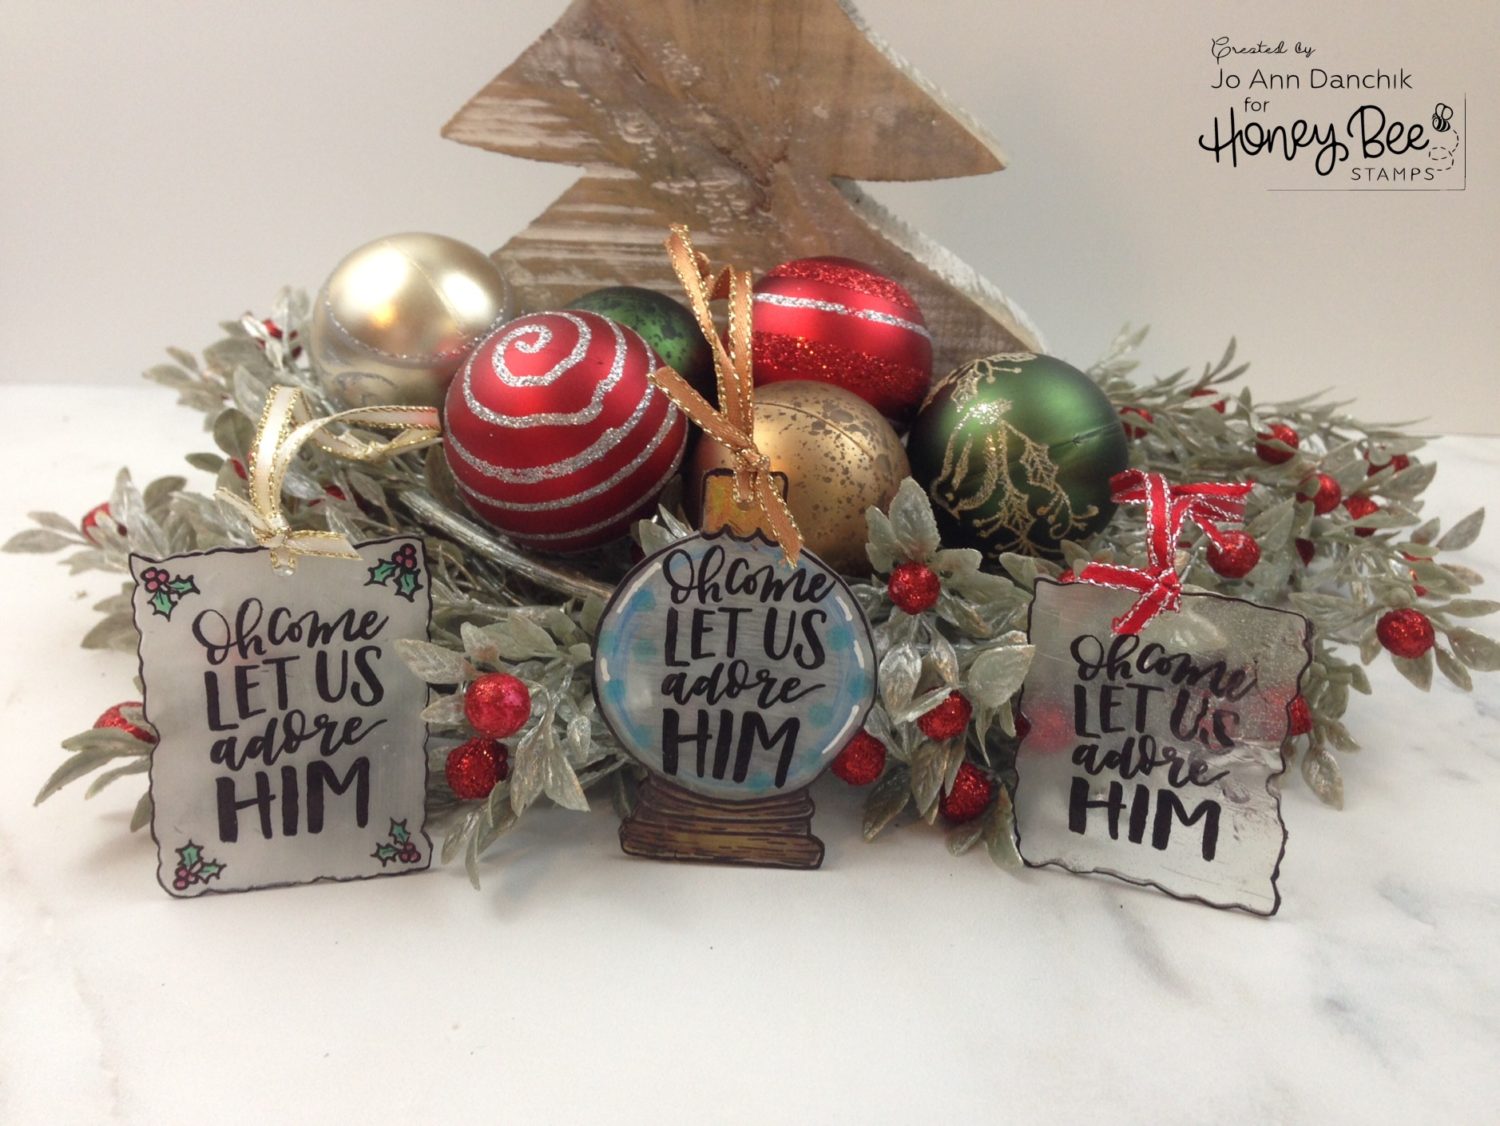
I am popping in this Saturday to share a quick last minute project before the holidays. Last Sunday I walked you through the basics on making Shrinky Dink Ornaments, using Honey Bee Stamps. You can see that post here.

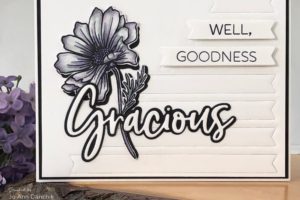
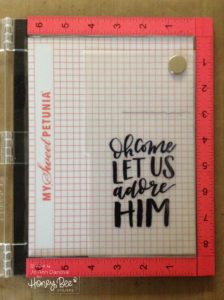
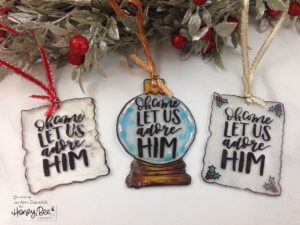
As I was finally cleaning up my work space and putting away those supplies, I had another idea. I wondered if I could find a way to use the large and lovely sentiment from the Adore Him stamp. Not only does it work, it is even faster and easier to create.

The Adore Him sentiment stamp is large enough that it didn’t need to be enlarged. I knew that using Staz-On would probably be the easiest to use on the slick plastic but my ink pad was on the dry side so I pulled out my Ranger’s Black Archival Ink. It can be heat set on a glossy surface. While this is an easy project there is a particular order that is best to follow.

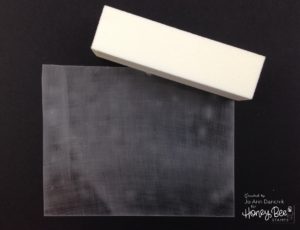
With all the pieces, I prepped the back of the plastic with a white fingernail sanding block to give it some tooth. Lightly sand the plastic and then turn the sheet and sand again in the opposite direction. This is now the back. Wipe both sides with a piece of Swiffer cloth to clean up the white powdery dust.

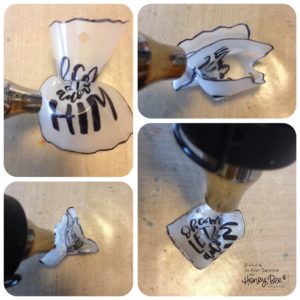
I first stamped the sentiment on the front of the Shrinky Dink plastic using my Misti tool. It needed to be stamped several times to get a good even coverage.

I soon realized that it would never dry enough to allow me to turn it over and color on the back. I went ahead and drew a ragged rectangle around it with a black Sharpie marker, cut it out, and punched a hole in the top.

You can shrink your ornament in an oven using the temperature and time recommended on the package. I opted to use my heat gun. I placed my non-stick Ranger mat on top of a cutting board to protect my work surface. Make sure to have a pair of tweezers and an acrylic block nearby.

If you use a heat gun try to start in the middle and apply heat evenly all around the piece. Because the ink was still fairly wet the piece wanted to stick to itself. Try not to panic when it curls into a blob. LOL Turn it over with the tweezers and keep heating. It usually uncurls at the end and starts to flatten. If you have a piece that sticks to itself you can quickly try to pull it apart with the tweezers. Use an acrylic block to smoosh it flat when you are done heating it.

This one is fairly simple and could be done in minutes if you use Staz-On. You would not have to wait for it to dry.

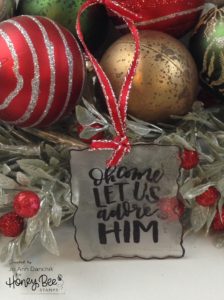
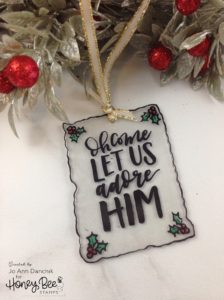
I decided to try this ornament again. I drew some simple holly and berries in each corner, using a black sharpie, on the shiny side. I colored them in on the back using my new Chameleon Colored Pencils. Back to the shiny side…I stamped the sentiment using my Misti Tool. It really takes several stamping layers to get good even coverage and the Misti works well for this. This time I let it all dry for about several hours. It melted much better and flattened out easily, with minimal sticking.

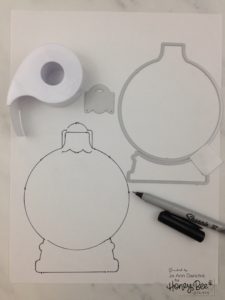
I was looking though my Honey Bee collection for other stamps that might work when I spied my large Globe & Ornament Shaker Card Die set. I got another idea! I laid out the dies and traced around them onto a piece of copy paper. I used this as my guide to transfer it to the plastic, using a Black Sharpie.

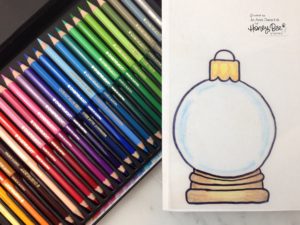
I used light blue and white pencils on the back to give the globe some dimension and a curved glass like appearance. I colored in the topper and base. Remember to keep your coloring on the light side as the colors tend to darken and intensify as the plastic shrinks.

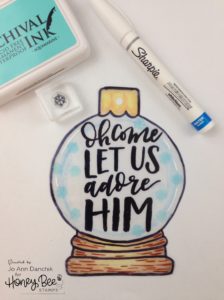
I put the piece in the Misti and stamped the sentiment. I scattered a few snowflakes around the edges, using a small snowflake from the Snow Birds stamp set, and Ranger’s Archival Aquamarine Ink. I let everything dry for a couple of hours. A water based white Sharpie Paint Pen was used to draw a few highlights for a reflective glass look.

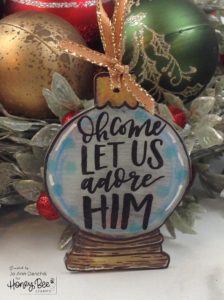
After cutting it out and punching a hole, I shrunk this ornament with the heat gun. I was really pleased with it. I think that you could also add the birds, snowmen, or other critters to the inside of the globe for a cute ornament.

These ornaments really were quick and easy and gave me another use for this simple, yet elegant sentiment. Tuck one into a card for a last minute hostess gift as you visit with family and friends this holiday season. They will look beautiful on your own tree as well.

I wish you all a safe and happy holiday season. Merry Christmas!

Thanks for joining me again today on this creative journey.
Joyfully, Jo Ann

SaveSave

SaveSave

SaveSave

SaveSave

SaveSave

SaveSave

SaveSave

SaveSave

SaveSave

SaveSave

SaveSave

SaveSave

5
Share

You also might be interested in

Creative Sundays with Jo Ann: Loads of Hugs & Kisses

Creative Sundays with Jo Ann: Loads of Hugs & Kisses

Jan 21, 2018

I have a passion for rusty old farm trucks filled[...]

Creative Sundays With Jo Ann: You’re My Person

Creative Sundays With Jo Ann: You’re My Person

Feb 25, 2018

I hope that you have been enjoying the new Cheerful[...]

Creative Sundays With Jo Ann: A Season of Hugs

Creative Sundays With Jo Ann: A Season of Hugs

Aug 19, 2018

Is it really almost fall? Is it time to pull[...]

Hello......I'm Jo Ann

Christian, wife, and proud mother and grandma. I love to create art, cook, read a good book, take photos, and travel. -Enjoy life now...this is not a rehearsal!

....

While this blog is my personal journey I hope that you find something here that encourages you to unfurl your wings and be creative. Most everybody has a little childlike creativity in them just waiting to be set free. It doesn't have to be perfect... just create.

....

…………………………………………..

Enter your email address below to subscribe to this blog. You will receive notifications of new posts by email.


* indicates required


*Check your email to confirm subscription.

…………………………………………..

Categories

  • Action Card
  • Alcohol Inks
  • Altered Art
  • Backgrounds
  • Banners
  • Birthday
  • Bookmark
  • Cards
  • Chalk
  • Christmas
  • Colored Pencils
  • Congratulations
  • Copics
  • Distress Inks
  • Distress Oxide Inks
  • Easter
  • Embossing
  • Embossing Paste
  • Encouragement Cards
  • Fall
  • Father's Day
  • Foiling
  • Friend
  • General
  • Get Well
  • Gift Card Holder
  • Gift Tags
  • Graduation
  • Halloween
  • Hello
  • Holiday
  • Holiday Decor
  • Home Decor
  • Ink Blending
  • Interactive
  • Love
  • Markers
  • Masking
  • Miss You
  • Mother's Day
  • New Years
  • No Line Coloring
  • One Layer Cards
  • Ornaments
  • Patriotic
  • Placemats
  • Project
  • Scene Building
  • Shadow Box Cards
  • Shaker Cards
  • Shape Cards
  • Shared Thoughts
  • Shrinky Dinks
  • St. Patrick's Day
  • Stencils
  • Sympathy
  • Tags
  • Techniques
  • Texture Paste
  • Thank You
  • Tools
  • Uncategorized
  • Valentines
  • Wall Art
  • Watercolor
  • Wedding / Anniversary
  • Wreath Builder

Archives

  • June 2019
  • May 2019
  • April 2019
  • March 2019
  • February 2019
  • January 2019
  • December 2018
  • November 2018
  • October 2018
  • September 2018
  • August 2018
  • July 2018
  • June 2018
  • May 2018
  • April 2018
  • March 2018
  • February 2018
  • January 2018
  • December 2017

Recent Posts

  • Midweek Creations With Jo Ann: Floral Cross Background
  • Creative Sundays With Jo Ann: Goodbyes Are Not Forever
  • Midweek Creations With Jo Ann: Tropical Rainforest Shaker Card
  • National Honey Bee Day Blog Hop: You’re The Bee’s Knees
  • Creative Sundays With Jo Ann: Mandala Love

Tags

Angel Policy Stamp Set and Dies Backgrounds Bill The Bear Stamp Set and Dies Birthday Cardmaking Cards Christmas Cloud Border Die Set Colored Pencils Copics Design Team Die Cutting Dies Distress Inks Distress Oxide Inks Encouragement Feelin' Foxy Stamp Set and Dies Friend General Hand Drawing Heat Embossing Holiday Honey Bee Stamps Ink Blending Love Mae The Mouse Stamp Set and Dies Markers Masking Misti Tool New Release One Layer Cards Papercrafting Penny The Platypus Stamp Set and Dies Pinky The Pig Stamp and Die Set Projects Scene Building Snow Buddies Stamp Set and Dies Stamping Stamps Techniques Tools Trinity Stamps Tutorial Valentines Watercolor

Instagram Feed

jadanchik

A study in two different mediums… Tim Holtz WC D A study in two different mediums…
Tim Holtz WC Distress Pencils -v- Windsor & Newton Cotman WC Paints. 👩‍🎨🎨
—————
1. On the right is my original painting using W & N paints. I mixed equal parts Intense Blue and Cadmium Red Pale Hue to make black. I added additional water and thinned down washes to the bird to make the blooms and drips. As the paint thins out it creates lovely bluish tints.
2. On the left I used Tim’s WC Pencils. Distress Black Soot Ink has the unique property of maintaining its true black color as it’s thinned with water. The pencils do as well. Hmmm 🤔 To remedy this I quickly made a thin wash with Prize Ribbon while the painting was still wet. I alternated adding thinned blobs of the black and blue wash until I got the desired results.
—————
The more I study it…the more I prefer the raven on the left! Do you have a favorite?
—————
@tim_holtz @ranger_ink #timholtz #distress #distressinks #distresspencils
When you still have your new pencils out…but hav When you still have your new pencils out…but have no idea what to do with yourself. Cleaning your mess is not the answer. 😜 Then out of the corner of your eye you see Tim’s new “Unraveled” stamp set from Stamper’s Anonymous and some leftover scraps of watercolor paper. You just start to paint. Not sure what it will become when I fussy cut it. Mum(my)’s the word! 🤫
—————
(Swipe left for process pics)
1. Stamped with Antique Linen Distress ink for no line painting.
2. Antique Linen says it all. It’s in the name! But it was too dark so I made a wash and added some Picket Fence to lighten it. The brown is a mix of Walnut Stain and Black Soot.
—————
@tim_holtz @stampersanonymous @ranger_ink #timholtz #stampersanonymous #distress #distressinks #distresspencils
Still testing out the new Tim Holtz Distress Penci Still testing out the new Tim Holtz Distress Pencils. And how much fun is Tim’s new “The Scarecrow” stamp set from Stamper’s Anonymous? 🧡
—————
(Swipe right for process pics)
1. I stamped the scene using Antique Linen Distress Ink for no line painting with the watercolor pencils.
2. I realized that I put the sun on the right but the shadows on the scarecrow are also on the right. 🤔 Simple fix. I wet the shadow lines and lifted them with a paper towel. The crow and the plaid shirt are my favorite parts!!
3. I wanted to create some color blends so I made some heavily pigmented washes.
4. I wasn’t sure how to add a background at this point without a lot of masking. I carefully flooded the paper with water, avoiding the painted areas, and floated in several different light color washes.
—————
@tim_holtz @stampersanonymous @ranger_ink #timholtz #stampersanonymous #distressink #distress #distresspencils
I know…I know…no posts for 2+ years and now he I know…I know…no posts for 2+ years and now here I am posting again! 😜 I would have made this a reel, but after an hour of trying to figure it out I gave up. 🫤
—————
After painting the cat, crow, and bats yesterday I immediately thought of Tim Holtz’s new “Gothic Tapestry” skull from Stamper’s Anonymous. And I wanted to play with my new Distress Pencils some more…of course I did!
—————
I stamped a partial picture using Hickory Smoke Oxide ink. The watercolor paper (140lb cold press) was very textured so the impression is sketchy at best, but I didn’t need a lot of details.
—————
I love it! (Hubby thinks that it looks like Chewbacca!! 😂) 

We are going to need open stock on the black pencil!! @ranger_ink @tim_holtz @stampersanonymous #timholtz #stampersanonymous #distress #distresspencils #watercolopencils
Part Two I tested several of my favorite watercolo Part Two
I tested several of my favorite watercolor pencil methods still using the Windsor & Newton professional cold press 140 lb watercolor paper. High quality paper is oftentimes more important than the quality of paint in getting good results.
1. The first swatch is pencil scribbled directly onto the paper and activated with a water brush. The Seedless Preserves is highly pigmented but a little harder to break down and dissolve. Darker reds and purples sometimes behave this way.
2. The second swatch is dipping the tip of the pencil in the water and smoothing with a wet brush. This delivers a large pigment load. You can also run a wet brush over the tip of the pencil  and then paint. These offer very smooth results.
3. The third swatch is a wash. I like to create a controlled wash. Yes…you can do this easily with pencils. Add a few drops of water to a porcelain well. Run your water brush over the tip of the pencil and swirl it into the water. Repeat multiple times until you get the paint to water ratio that you want. With a wash you can add many layers to your painting.
4. The top picture shows how well the colors lift. This is useful info for adding highlights and shading or if you accidentally drop color in an unwanted area. Being Distress Inks, they don’t appear to react quite the same to water droplets as regular Distress Inks. They do lift when dry, but some colors stain more than others.
(continued in comments)
timholtz @ranger_ink #timholtz #distress #distresspencils #watercolorpencils
Part One I have been watching for the UPS driver a Part One
I have been watching for the UPS driver all week. When my package of Distress Pencils arrived yesterday afternoon I nearly snatched it from their hands! 😂
I work a lot with different watercolor paints, pencils, and crayons so I was eager to play with them. I used Windsor & Newton professional cold press 140 lb watercolor paper to test them. It’s bumpy so you get a lot of white space when you scribble on the pigment.
1. As I tend to layer colors I immediately put them into color families. I know that you like to dig for them Tim but I need them in color order and don’t have your patience. You are a “hunter” and I am a “gatherer.” 😜
2. I swatched them out…not only to have a chart but to check on several properties. It shows me how easily the different colors dissolve on the paper but also how they “water down” into a wash near the bottom of the swatch. The black line shows their transparency. Most colors are highly pigmented, yet transparent, and easy to dissolve.
So far I am loving them!!! (More in next post.)
@tim_holtz @ranger_ink  #timholtz #distress #distresspencils #watercolorpencils
I have been doing a lot of watercoloring this summ I have been doing a lot of watercoloring this summer and thought that I might start posting again. (I haven’t shared my art work socially in over 2 years.) I painted these three Halloween Decoration Cards this morning using Windsor & Newton paints. They are from an older Michael’s class (free) taught by Mandy Peltier. They were a hoot to paint!
@mandypeltierartist @michaelsstores @winsorandnewton #winsorandnewton #makeitwithmichaels #michaelsclasses
Sometimes it is hard to step back, reevaluate, and Sometimes it is hard to step back, reevaluate, and admit that you need to see things differently!! These are powerful phrases that I intend to learn and to use gracefully.
—————
Thanks my friend for allowing me to share your wise words! ❤️@turnertr03
I am learning. I am listening. #blackouttuesday #a I am learning. I am listening.
#blackouttuesday #amplifymelanatedvoices
Load More... Follow on Instagram

Copyright Statement:

All content, including text, photos, and projects are the property of  Jo Ann Danchik. I encourage you to use this blog as inspiration for your personal projects. If you use any parts of this blog on another blog, website, or in any other public forum, please link back to this blog at jadanchik.com rather than copy and paste any of the information.


© [2017] · Jo Ann Danchik · All Rights Reserved.

Prev Next